ABSTRACT
There is a constantly growing need for products and technologies that for their realisation require hermetically closed elements, vessels and tubes. Envelopes with greater or smaller vacuum tightness had to assure a satisfactory isolation between external atmosphere and inside over- or underpressure. Crytical leak spots in closed systems are usually: connections, gaskets, welded and brazed joints, defects in material etc. Regarding to quality demands in different production processes, technical people very often encounter with standards for tightness testing. Wishing to state if an element or system meets with corresponding standards we have to be familiar with the procedures enabling the following appointments:
– question if there is leakage or not
– settlement of the leak size
– detection of leak locality
For solving the mentioned problems different treatments and techniques are known but among them there is no an universal method, Each testing is suitable only for a selected leak rate or for fixed forms and technologies. Our article presents the leak types, their sizes and various leak detection techniques.
Keywords: tightness, leakage, trace gas, helium mass spectrometer leak detector, hermetic sealing
1. INTRODUCTION
● The words “leak” and “leakage” appear in the field of vessels’ hermetical closing and do not confront only with vacuum technologists but also engineers working with high pressures. A leak means an unintended crack, hole or porosity in an enveloping wall or joint which must contain or exclude different fluids and gases allowing the escape of closed medium. The basic functions of leak detection are the localization and size measurement of leaks in sealed products and systems For majority of examples, a leak test procedure is a quality control step to assure a device integrity, and is one-time non destructive test.
● Typical products in which the leak detection has to be used are: vacuum chambers, TV- , and other cathode tubes, hermetically sealed electronic components, pressure vessels, aerosol containers, vacuum thermal isolation (e.g. dewars), pumps, refrigerating systems, chemical and nuclear plants, beverage cans, products containing metal bellows, electron microscopes, peace makers, etc.
● In spite of modem technologies it is practically impossible to manufacture a sealed enclosure or system that can be guaranteed to be leak proof without first being tested. The main question is: what is the maximum acceptable leak rate consistent with reasonable performance life of the product.
● We can distinguish different types of leak sources.
● Leaks caused by defects in the containing envelope. For example a too thin wall of a plastic bottle becomes microscopic cracked at enough high pressure difference, or in canning industry if the score mark is too deep in ring pull-tab can top, or porous cast in machine housing metallurgy, etc.
● Leaks in newly manufactured products are most commonly imperfect joints or seals by which various parts are assembled to form the final article. There are known demountable and fixed joints. Between them the most often used are welds, brazed and soldered joints glass-to-metal and ceramic-to-metal seals, O-rings and other gaskets, etc.
● Materials permitting gas diffusion and permeation through the wall.
● Virtual leak, a special type of leak in vacuum technique, which is not really a leak but is the internal source of gas or vapor. These are cavities in a chamber wall with thin connections to the inner vessel space such as improper welds, closed threads and holes etc.
2. LEAK SIZES AND MEASUREMENTS OF LEAK RATES
The shapes of leaks (cracks, fissures, porosity, damages, etc … ) are very different, unknown and non-uniform. Therefore it is impossible to measure their sizes with any geometrical dimension except of course in the case of an ideal or artificial leak as used for calibration. How then to define the leak size? A generally accepted method became the observation of gas or fluid flow through it in certain conditions of temperature and pressure difference. Consequently leak rates can be defined in two ways:
○ in terms of the application, e.g.: 3 g of refrigerant R-12 in 2 years at 5 bar, or 65 m of oil per year at 60 �C at atmospheric pressure, etc…
○ in terms of vacuum leak detection method, e.g.: 2 mbar pressure increase in I hour or 3x 10⁻⁷ mbar/s helium (using He-detection method)
Each of the mentioned examples gives a legitimate description of leak rate but the generally accepted unit is the last one because of very simple and understandable helium leak detection. Its efficiency is the result of a fierce and highly competitive developments within the last 15-20 years.
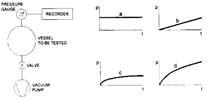
The basic experiment explaining the leakage of hermetic system (increasing pressure method) is presented in Figure 1. The tested vessel or system with known volume (Vo) is by a valve connected to pump. After evacuation the connecting valve should be closed and then the pressure in volume registered for a suitable long time period. There are more possibilities: system is tight and clean (a), fight and not clean (b), not tight and clean, i.e.: ideal leak (c), not tight and not clean, i.e.: combination of leak and degassing.
As we can see in each case (except for a tight vessel) we have pressure increase and regarding to the shape of diagram we can conclude the type of leak. Using the curve inclination data the leak size can be determined by the following formula:
Q = ^p * Vo/^ t (mbarl/s)
This simple test helps us to describe the situation at the beginning of leak tracing procedure. Very similar test can be realized by pressurizing the the system (and detecting the pressure decay) but gives only data on leak size and is not used so often.
The leak rate Q does not only depend on the geometric dimensions (diameter, length) of the leak but also on the physical properties of the gas (or the liquid), such as viscosity, relative molecular mass and on the pressure difference. For example: in the same environment conditions helium flows through orifices 2.7 times faster than air. Because of different results if the same leak is measured by various mediums it must be always noted with which gas a testing was performed.
The maximum acceptable leak rate for a given product depends on the nature of product. Since the cost of leak detection (and manufacturing too hermetic envelopes) increases in inverse proportion to a leak rate, it follows that testing for unnecessary small leaks causes unnecessary rise of production costs. Some examples of tolerated leaks in different elements and systems are shown in Table 1. We can see very wide range of sizes: from great with some tenths mbar l/s in rough vacuum devices, to million- and more- times smaller in hermetically closed electronic elements. It is possible to state there are no ideal products without leakage. We only can demand they have leaks smaller than the specified leak.
| Table 1. Leak rate specification for various elements and systems | ||
| Element or System | Max. permissible Leakage | Remark |
| chemical process equipment | 10-1 to 1 mbar l/s | great process flows |
| beverage can bottom | 10-5 to 10-6 mbar l/s | retention of CO2 |
| dynamic pumped vacuum s. | 10-5 to 10-7 mbar l/s | permanent pumping |
| IC-package | 10-7 to 10-8 mbar l/s | |
| pacemaker | cca 10-9 mbar l/s | long time implanted in body |
| closed vacuum elements | 10-8 to 10-10 mbar l/s | e.g. TV- and Xray- tubes |
3. LEAK DETECTION METHODS
A few leak detection techniques are known. Their performances regarding to detecting sensitivity are presented in Fig 2. Because of their advantages we shall concentrate attention on the helium mass spectrometer techniques but at first a short description of others is presented,
The spark coil technique uses a high voltage or Tesla cod and sparkling point to create the electromagnetic radiation which causes the generation of glow discharge in neighbouring evacuated ampoules. Normally it is possible only in non metal envelopes, that means first of all in glass and plastic elements or tubing. Drawing the leak antenna along the tested element we can see plasma inside and coming to the leak, a sharp arc passage between plasma and antenna appears. The defect spot is very clearly marked and a skilled person can from the colour of plasma also estimate the inner pressure. This simple method however has a number drawbacks; since besides the restricted application it is also to be avoided because of radio disturbances.
Pressure change method uses pressure gauges which are ordinary used to monitor the system performance. Suspected leak sites can be squirted with a solvent (i.e. acetone or similar) while watching the gauge for a pressure rise that occurs when the solvent enters the leak. This method has limited sensitivity (depending also on the type of pressure measurement cell) and some shortcomings (possibility of solvent freezing causes temporary stuffing of leak, solvents may attack vacuum grease and elastomer gaskets).
 Figure 1. Testing of tightness by increasing pressure method and various possible results Figure 1. Testing of tightness by increasing pressure method and various possible results |
| Bubble test (soap painting) | ——- | ——- | — | ——- | ——- | ——- | ——> | ||||||||
| Bubble test (air, water) | ——- | ——- | — | ——- | –> | ||||||||||
| Bubble test (He, alcohol | ——- | ——- | – | ——- | ——- | —> | |||||||||
| He sniffer | ——- | ——- | — | ——- | ——- | ——- | ——- | ——- | ——- | —> | |||||
| Halogen sniffer | ——- | ——- | — | ——- | ——- | ——- | ——- | ——- | -> | ||||||
| Pressure decay | ——- | ——- | — | ——- | —-> | ||||||||||
| Acoustical | ——- | ——- | — | ——- | ——- | -> | |||||||||
| Vacuum decay | ——- | ——- | — | ——- | ——- | —-> | |||||||||
| Spark tester | ——- | ——- | — | ——- | ——> | ||||||||||
| Thermal conductivity | ——- | — | – | ——> | |||||||||||
| Radioisotope | ——- | ——- | — | ——- | ——- | ——- | ——- | ——- | ——- | ——- | ——- | ——- | ——> | ||
| Halogen detector | —— | – | ——- | ——- | ——- | ——- | ——- | ——> | |||||||
| Mass spectrometer | ——- | — | — | ——- | ——- | ——- | ——- | ——- | ——- | ——- | ——- | ——- | ——- | ——> | |
| Dye penetrant | ——- | ——- | — | ——- | ——- | ——- | ——- | ——> | |||||||
| mbarl/s | 100 | 10 | 1 | 10-1 | 10-2 | 10-3 | 10-4 | 10-5 | 10-6 | 10-7 | 10-8 | 10-9 | 10-10 | 10-11 | 10-12 |
| Figure 2. Sensitivity ranges of various leak detection methods |
Overpressure methods can be performed by fluid or gas with which the tested element must be filled. As a fluid usually the water from house installation is used. Observing the outside surface the wetted areas show us great leaks and smaller ones up to approx. I mbarl/s. Testing with gas, the vessel is subjected to overpressure of some bars (depending on material and wall thickness) and immersed into the water. At leaks the gas bubbles begin to escape. In this manner the leaks up to 1. 10-3 mbarl/s can be detected. If the vessel is too great for immersion, the suspected points should be painted by soap solution and again we can see the bubbles escaping if there is a leak. This method enables detecting the leakage up to 10-5 mbarl/s and is usable also for very large systems.
Halogen leak detectors are used in the detector-probe mode (to 10-3 mbarl/s), requiring that the system be pressurized with a gas containing an organic halide, such as one of the Freons. The exterior of the system is then scanned with a sniffer probe sensitive to traces of the halogen -bearing gas (Fig. 3). The principle is based on the increased positive ions (K or Na) emission because of sudden halide composition presence. The ion current is the measure for a leak size. Halogen detectors can be used also in turned mode: evacuated vessel is connected to detecting instrument and is sprayed by freon. In this manner its performance is up to 5.10-7 mbarl/s and is used in rough, medium and high vacuum.
 Figure 3. Halogen leak detector Figure 3. Halogen leak detector |
Dye penetrant method is an adaptation of a technique used to find cracks in metals and defects in welds. It uses a low viscosity fluid that exhibits a high rate of surface migration. This fluid is painted on one side of a suspected leak site, and after a time, it is detected on the other side of the wall. The test is simple, low cost, it leaves records, the sensitivity can be as high as 10-6 mbarl/s
Acoustical leak detection uses the sonic or ultrasonic energy generated by gas as it expands through an orifice. Pressurized gas proceeds from tested system through leaks which are detected outside by sensible microphone (tipically about 40 000 Hz). Acoustical leak detection is widely used in testing high pressure lines, ductworks etc. It requires modest instrumentation; it is simple and fast but is limited to about 10-3 mbarl/s.
Radioisotope method is useful only for testing hermetically sealed components. They are placed in a chamber which is to be evacuated and filled with radioactive tracer gas (tipically krypton 85). It difuses through present leaks in the components and after removing it from environs test gas expands through leaks back and can be detected by radiation sensor. The instruments for this type leak tracing are very expensive but they enables the measurement of flows up to 10- 11 mbarl/s.
Mass spectrometers as leak detectors are used as most sensitive instruments for stating leak existence and presence in vacuum systems. They are adjusted on the atom respectively molecular weight of tracer gas. It is usually helium because of.
– its small mass and atom volume assures good supply of gas through a leak -relatively great mass distance from neighbour mass enables greater sensitivity – its partial pressure in air is low, approx. 4.10-3 mbar
The first next suitable gas for leak detection purposes would be H2 but it is dangerous and residual atmosphere in vacuum systems always contains this gas. There are also spectrometers adjustable to other gases e.g. argon.
4. HELIUM MASS SPECTROMETER (MS-) LEAK DETECTION
● Helium leak detection systems work as follows: He is introduced to a test part that is connected to the leak detector. The helium travels through leak into the leak detector, its partial pressure is sensed respectively measured and results are displayed on instrument as flow rate.
● The main part of the device is mass spectrometer, a sensor for different gas masses. In very low pressure (or vacuum) the molecules of rest gasses are transformed in ions by electron impact. Separating the ionized particles of different mass to charge ratios (q/m) it is possible to state the partial pressures of present gases – in our case also the presence of the sought gas helium. For helium MS- leak detectors, magnetic sector type mass spectrometers are preferably used as gas search sensors. The low pressure (less than 2×10⁻⁴ mbar) required for operation of the mass spectrometers is produced by an integrated high vacuum pump system. The auxiliary vacuum pump required for rough pumping the tested equipment is either incorporated or can be attached via suitable connection.
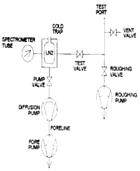
 Figure 4. Conventional type of the helium leak detection apparatus Figure 4. Conventional type of the helium leak detection apparatus |
● As the necessary pressure for the mass spectrometer cannot always be attained in the tested equipment within a reasonable pump-down time, various types of MS-leak detectors with different performances have been developed. The most used are constructions with “full flow operation” (conventional) and with “contra-flow operation”, regarding to the way in which He is supplied towards MS- sensor. For example the figure 4 shows schematically the conventional type MS leak detector. In presented system, vacuum is maintained in the spectrometer tube by use of a diffusion pump in combination with mechanical pump. A cold trap pumps condensable vapors such as oil and water. A roughing pump is provided to evacuate the test port (and the connected sample to be tested) to a pressure level that will not disrupt diffusion pump operation. Reaching a suitable vacuum the sample is valved off from the rough pump and by opening test valve joint to the MS- vacuum system. Helium sprayed near the leak on the sample surface has now an open way to the MS-tube and there it is detected. After completing procedure the test port is valved off from the leak detector and vented to air; than we can change the sample.
● How to use a helium MS- leak detector? There are basically four different techniques for finding leaks: two “OUTSIDE-IN” and two “INSIDE-OUT” methods (Fig.5).
● In the most commonly used “outside-in” technique, the sample to be tested is connected to leak detector and evacuated (Fig.5a). Than its surface is “probed” with a pointed jet of helium. Coming over a leak detector gives an acoustic or visible sign (exactly location) and the data about leak size.
● The second technique (Fig.5b) consists of evacuating and hooding the sample with something like a plastic sheet and flooding the hood with helium. So it is possible quickly to establish whether or not a sample leaks and to establish the total leak rate. This technique is most useful on production lines where a test piece must be accepted or rejected.
● In “inside-out” techniques the test configuration is reversed. Instead of being evacuated, the sample is pressurized with He. In this case the leak detector is equipped with so called detector probe and it can be used in two modes presented in figures 5c and 5d. In mode c) the test piece is probed with the detector probe around suspected leak sites. This method sensitivity (up to 1. 10-6 mbarl/s) is not as good as by others because the helium in the air is constantly being admitted into the detector.
●  Figure 5. Main leak detection techniques with MS-leak detector and The tracing gas. In one mode (examples a and b) He flows from outside into vacuum and in other it expands from inner overpressure in atmosphere Figure 5. Main leak detection techniques with MS-leak detector and The tracing gas. In one mode (examples a and b) He flows from outside into vacuum and in other it expands from inner overpressure in atmosphere |
● Mode d) allows testing of a large number of samples simultaneously. It is often called the bombing technique because the parts are previously placed in a pressurized The vessel where the helium leaks into the parts which leak. All parts are than exposed to detector probe in closed container. The mentioned leak test techniques are the main methods for establishing whether leaks exist and for locating where they are. Each has its own advantages and shortcomings, each has also its own individual set of variations.


