Particle strengthening by precipitation

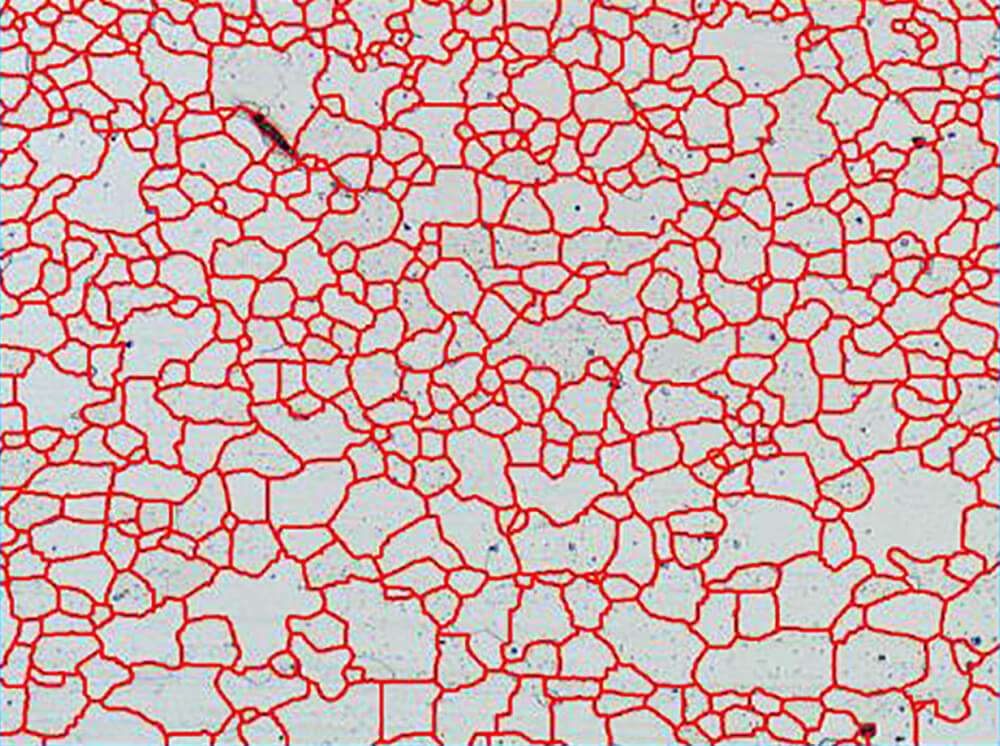
The strength and hardness of some metal and alloys may be enhanced by the formation of extremely small uniformly dispersed particles of a second phase within the original phase matrix; this  must  be  accomplished  by  phase  transformations  that  are  induced  by  appropriate  heat treatments. The process is called precipitation hardening because the small particles of the new phase  are  termed  “precipitates”.  Precipitation  hardening  and  the  treating  of  steel  to  form tempered matrensite are totally different phenomena, even though the heat treatment procedures are similar.

Read More

Eutectoid and Peritectic Reactions

The eutectoid (eutectic-like) reaction is similar to the eutectic reaction but occurs from one solidphase to two new solid phases. It also shows as V on top of a horizontal line in the phase diagram. There are associated eutectoid temperature (or temperature), eutectoid phase, eutectoid and proeutectoid microstructures. The peritectic reaction also involves three solid in equilibrium, the transition is from a solid + liquid phase to a different solid phase when cooling. The inverse reaction occurs when heating.

Read More

Development of microstructure in eutectic alloys

Case of lead-tin alloys, A layered, eutectic structure develops when cooling below the eutectic temperature. Alloys which are to the left of the eutectic concentration (hipoeutectic) or to the right (hypereutectic) form a proeutectic phase before reaching the eutectic temperature, while in the solid + liquid region. The eutectic structure then adds when the remaining liquid is solidified when cooling further. The eutectic microstructure is lamellar (layered) due to the reduced diffusion distances in the solid state. To obtain the concentration of the eutectic microstructure in the final solid solution, one draws a vertical line at the eutectic concentration and applies the lever rule treating the eutectic as a separate phase.

Read More

Binary Eutectic Systems

Interpretation: Obtain phases present, concentration of phases and their fraction (%). Solvus line: limit of solubility Eutectic or invariant point. Liquid and two solid phases exist in equilibrium at the eutectic composition and the eutectic temperature. The melting point of the eutectic alloyis lower than that of the components (eutectic = easy to melt in Greek).• At most two phases can be in equilibrium within a phase field.• Single-phase regions are separated by 2-phase regions.

Read More

Development of microstructure in isomorphous alloys

a) Equilibrium cooling Solidification in the solid + liquid phase occurs gradually upon cooling from the liquidus line. The composition of the solid and the liquid change gradually during cooling (as can be determined by the tie-line method.) Nuclei of the solid phase form and they grow to consume all the liquid at the solidus line. b) Non-equilibrium cooling Solidification in the solid + liquid phase also occurs gradually. The composition of the liquid phase evolves by diffusion, following the equilibrium values that can be derived from the tie-line method. However, diffusion in the solid state is very slow. Hence, the new layers that solidify on top of the grains have the equilibrium composition at that temperature but once they are solid their composition does not change. This lead to the formation of layered (cored) grains (Fig. 9.14) and to the invalidity of the tie-line method to determine the composition of the solid phase (it still works for the liquid phase, where diffusion is fast.)

Read More

Interpretation of phase diagrams

Concentrations: Tie-line method a)  locate composition and temperature in diagram b)  In two phase region draw tie line or isotherm c)  note intersection with phase boundaries. Read compositions. Fractions: lever rule a)  construct tie line (isotherm) b)  obtain ratios of line segments lengths.

Read More

Phase Diagrams

Equilibrium Phase Diagrams Give  the  relationship  of  composition  of  a  solution  as  a  function  of  temperatures  and  the quantities of phases in equilibrium. These diagrams do not indicate the dynamics when one phase transforms into another. Sometimes diagrams are given with pressure as one of the variables. In the phase diagrams we will discuss, pressure is assumed to be constant at one atmosphere. Binary Isomorphous Systems This very simple case is one complete liquid and solid solubility, an isomorphous system. The example is the Cu-Ni alloy of Fig. 9.2a. The complete solubility occurs because both Cu and Ni have the same crystal structure (FCC), near the same radii, electronegativity and valence. The liquidus line separates the liquid phase from solid or solid + liquid phases. That is, the solution isliquid above the liquidus line. The solidus line is that below which the solution is completely solid (does not contain a liquid phase.)

Read More

Grain size determination

The grain size is often determined when the properties of a polycrystalline material are under consideration. In this regard, there exist a number of techniques by which size is specified in terms of average grain volume, diameter, or area. Grain size may be estimated by using an interceptmethod, described as follows. Straight lines all the same length are drawn through several photomicrographs that show the grain structure. The grains intersected by each line segment are counted; the line length is then divided by an average of the number of grains intersected, taken over all the line segments. The average grain diameter is found by dividing this result by the linear magnification of the photomicrographs. Grain size is measured with a microscope by counting the number of grains within a given area, by determining the number of grains that intersect a given length of random line, or by comparison with standard charts. The average grain diameter D can be determined from measurements along random lines by the equation where L is the length of the line and N is the number of intercepts which the grain boundary makes with the line. This can be related to the ratio of the grain-boundary surface area S to the volume of the grains, V, by the equation where 1 is the total length of grain boundary n a random plane of polish and A is the total area of the grains on a random plane of polish. A very common method of measuring grain size in the United States is to compare the grains at a fixed magnification with the American Society for Testing and Materials (ASTM) grain-size charts. The ASTM grain-size number n is related to N , the number of grains per square inch at a magnification of 100X by the relationship Table shown compares the ASTM grain-size numbers with several other useful measures of grain size.

Read More

Microstructural Exam

Microstructure is defined as the structure of a prepared surface or thin foil of material as revealed  by  a  microscope  above  25×  magnification. The  microstructure  of  a  material  can strongly influence physical properties such as strength, toughness, ductility, hardness, corrosion resistance, high/low temperature behavior, wear resistance, and so on, which in turn govern the application of these materials in industrial practice. a) Sectioning and cutting The areas of interest forming the metallography specimens need to be sectioned for ease of handling. Depending on the type of material, the sectioning operation can be done by using abrasive cutter (for metal and metallic composite), diamond wafer cutter (ceramics, electronics and  minerals)  or  thin  sectioning  with  a  microtome  (plastics).  In  order  not  to  damage  the specimen, proper cutting requires the correct selection of abrasive cutting wheel, proper cutting speed & cutting load and the use of coolant. b) Mounting The mounting operation accomplishes three important functions: 1. To protects the specimen edge and maintain the integrity of materials surface features. 2. Fill voids in porous materials. 3. Improves handling of irregular shaped samples. Samples for microstructure evaluation are typically encapsulated in a plastic mount for handling during sample preparation. Large sample or samples for macrostructure evaluation can be prepared without mounting. The metallography specimen mounting is done by encapsulating the specimen into: 1.   A  compression/hot  mounting  compound  (thermosets  –  e.g.  phenolics,  epoxies  or thermoplastics – e.g. acrylics) 2.   A castable resin/cold mounting (e.g. acrylics resins, epoxy resins and polyester resins) c) Grinding Grinding is required to ensure the surface is flat & parallel and to reduce the damage created during sectioning. Grinding is accomplished by decreasing the abrasive grit size sequentially to obtain the required fine surface finish prior to polishing. It is important to note that the final appearance of the prepared surface is dependent on the machine parameters such as grinding/polishing pressure, relative velocity distribution and the direction of grinding/polishing. d) Polishing For microstructure examination a mirror/reflective finish is needed whereas a finely ground finish is adequate for macrostructure evaluation. Polishing can be divided into two main steps: 1. Rough polishing The purpose is to remove the damage produced during grinding. Proper polishing will maintain the specimen flatness and retain all inclusions or secondary phases by eliminating the previous damage and maintaining the specimen integrity. 2. Fine polishing The purpose is to remove only surface damage. e) Etching…

Read More

Liquid-Penetration test

This test is employed for detection of small defects which are very small to detect with the naked eye. This test is used to detect surface cracks or flaws in non-ferrous metals. This test employs a visible colour contrast dye penetrant technique for the detection of open surface flaws in metallic and non-metallic objects. The penetrants are applied by spraying over the surface of material to be inspected. The excess penetrant is then washed or cleaned. Absorbent powder is then applied to absorb the penetrants in the cracks, voids which reveals the flaws. This test reveals flaws such as shrinkage cracks, porosity, fatigue cracks, grinding cracks, forging cracks, seams, heat treatment cracks and leaks etc., on castings, weldings, machined parts, cutting tools, pipes and tubes. If the fluorescent penetrant is used, the developed surface must be examined under ultra violet light to see the presence of defects. This technique is used for non-porous and non- absorbent materials. Care may be taken to clean the surface so that it is free from dust, scale, etc. to have better results. Penetrants are highly toxic and flammable and hence proper precautions should be taken both during use and of storage of penetrants.

Read More