Introduction
Nondestructive material testing with ultrasonics is more than 40 years old. From the very first examinations, using ultrasonic oscillations for detection of flaws in different materials, it has become a classical test method based on measurements with due regard to all the important influencing factors. Today it is expected that ultrasonic testing, supported by great advances in instrument technology, give reproducible test results within narrow tolerances. This assumes exact knowledge of the influencing factors and the ability to apply these in testing technology. Not all influences have to be seriously regarded by the operator. In many cases some of the influences can be neglected without exceeding the permitted measurement tolerances. Due to this, the test sequence is simplified and the testing time reduced. Despite this, the future belongs to the qualified operator who carries out his task responsibly and who continuously endeavours to keep his knowledge at the latest state of the art.
Why use ultrasonics for nondestructive material testing?
● At the beginning of the fifties the technician only knew radiography (x-ray or radioactive isotopes) as a method for detection of internal flaws in addition to the methods for nondestructive testing of material surfaces, e.g. the dye penetrant and magnetic particle method. After the Second World War the ultrasonic method, as described by Sokolovin 1935 and applied by Firestonein 1940, was further developed so that very soon instruments were available for ultrasonic testing of materials. The ultrasonic principle is based on the fact that solid materials are good conductors of sound waves. Whereby the waves are not only reflected at the interfaces but also by internal flaws (material separations, inclusions etc.). The interaction effect of sound waves with the material is stronger the smaller the wave length, this means the higher the frequency of the wave.
| ● | ● c = Sound velocity [km/s]● f = Frequency [MHz]● l = Wave lenght [mm] |
● This means that ultrasonic waves must be used in a frequency range between about 0.5 MHz and 25 MHz and that the resulting wave length is in mm. With lower frequencies, the interaction effect of the waves with internal flaws would be so small that detection becomes questionable. Both test methods, radiography and ultrasonic testing, are the most frequently used methods of testing different test pieces for internal flaws, partly covering the application range and partly extending it. This means that today many volume tests are possible with the more economical and non-risk ultrasonic test method, on the other hand special test problems are solved, the same as before, using radiography. In cases where the highest safety requirements are demanded (e.g. nuclear power plants, aerospace industry) both methods are used.
Ultrasonic testing tasks
● Is there a primary classification of tasks assigned to the ultrasonic operator? If we limit ourselves to testing objects for possible material flaws then the classification is as follows:
1. Detection of reflectors
2. Location of reflectors
3. Evaluation of reflectors
4. Diagnosis of reflectors (reflector type, orientation, etc.)
● Instead of using the word “reflector”, the ultrasonic operator very often uses the term “discontinuity”. This is defined as being an “irregularity in the test object which is suspected as being a flaw”. In reality, only after location, evaluation and diagnosis has been made, can it be determined whether or not there is a flaw which effects the purpose of the test object. The term “discontinuity” is therefore always used as long as it is not certain whether it concerns a flaw which means a non-permissible irregularity.
Detection of discontinuities
The essential “tool” for the ultrasonic operator is the probe, Figs. 1a + 1b. The piezoelectric element, excited by an extremely short electrical discharge, transmits an ultrasonic pulse. The same element on the other hand generates an electrical signal when it receives an ultrasonic signal thus causing it to oscillate. The probe is coupled to the surface of the test object with a liquid or coupling paste so that the sound waves from the probe are able to be transmitted into the test object.
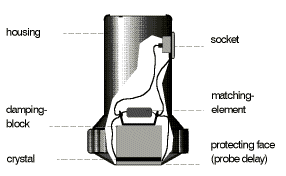 Fig. 1a Straight-beam probe (section) Fig. 1a Straight-beam probe (section) | 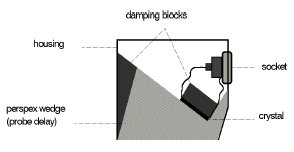 Fig. 1b Angle-beam probe (section) Fig. 1b Angle-beam probe (section) |
The operator then scans the test object, i.e. he moves the probe evenly to and fro across the surface. In doing this, he observes an instrument display for any signals caused by reflections from internal discontinuities, Fig. 2.
 Fig. 2a Plane flaw – straight-beam probe Fig. 2a Plane flaw – straight-beam probe |  Fig. 2b Plane flaw – angle-beam probe Fig. 2b Plane flaw – angle-beam probe |
Every probe has a certain directivity, i.e. the ultrasonic waves only cover a certain section of the test object. The area effective for the ultrasonic test is called the “sound beam” which is characteristic for the applied probe and material in which sound waves propagate. A sound beam can be roughly divided into a convergent (focusing) area, the near-field, and a divergent (spreading) part, the far field, Fig. 3. The length N of the near-field (near-field length) and the divergence angle is dependent on the diameter of the element, its frequency and the sound velocity of the material to be tested. The center beam is termed the acoustic axis.
The shape of the sound beam plays an important part in the selection of a probe for solving a test problem. It is often sufficient to draw the acoustic axis in order to show what the solution to a test task looks like. A volumetric discontinuity (hollow space, foreign material) reflects the sound waves in different directions, Figs. 4a + 4b.
 Fig. 4a Volumetric discontinuity – straight-beam probe Fig. 4a Volumetric discontinuity – straight-beam probe | 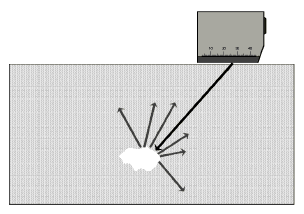 Fig. 4b Volumetric discontinuity – angle-beam probe Fig. 4b Volumetric discontinuity – angle-beam probe |
The portion of sound wave which comes back to the probe after being reflected by the discontinuity is mainly dependent on the direction of the sound wave; i.e. it does not matter whether scanning is made with a straight-beam probe or an angle-beam probe or whether it is carried out from different surfaces on the test object, Fig. 5. If the received portion of the reflected sound wave from the probe is sufficient then the detection of the existing volumetric discontinuity is not critical, this means that the operator is able to detect it by scanning from different directions. A plane (two-dimensional) discontinuity (e.g. material separation, crack) reflects the ultrasonic waves mostly in a certain direction, Fig. 6.
 Fig. 5 Volumetric flaw – detection form different directions Fig. 5 Volumetric flaw – detection form different directions |  Fig. 6 Reflection on angled plane discontinuity Fig. 6 Reflection on angled plane discontinuity |
If the reflected portion of the sound wave is not received by the probe then it is unlikely that the discontinuity will be detected. The possibilities of detection only increase when the plane discontinuity is hit vertically by the sound beam. This applies to discontinuities which are isolated within the test object.
 Fig. 7 Apparent deformation of the sound beam on a side wall Fig. 7 Apparent deformation of the sound beam on a side wall |
With plane discontinuities which are open to the surface of the test object, e.g. a crack running vertically from the surface into the test object, a vertical scan of the crack does not always produce the required success. In this case wave overlapping occurs (interferences) due to sound wave reflection on the side wall of the test object which seems as if the sound wave bends away from the corresponding side wall, Fig. 7. In such cases, the probability of crack detection is very good if the angle reflection effect is used, Fig. 8a. At the 90° edge, between the crack and the surface of the test object, the sound waves are reflected back within themselves due to a double reflection, Fig. 8b. Use of the angle reflection effect is often even possible when a plane discontinuity, which is vertical to the surface, does not extend to the surface and under the condition that the sound wave reflections at the discontinuity and the surface are received by the probe, Fig. 9.
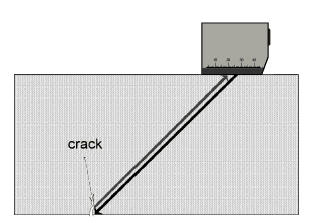 Fig. 8a Crack detection with 45° scanning Fig. 8a Crack detection with 45° scanning | 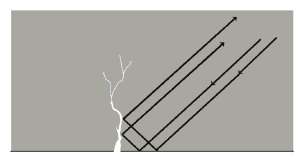 Fig. 8b Angle reflection effect Fig. 8b Angle reflection effect |
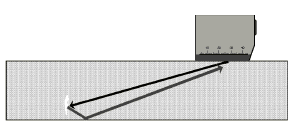 Fig. 9 Plane, vertical reflector near the surface Fig. 9 Plane, vertical reflector near the surface |
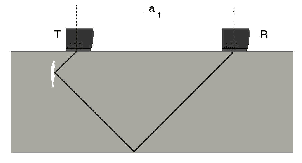 Fig. 10a Angle reflection effect Fig. 10a Angle reflection effect | 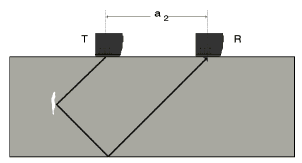 Fig. 10b Tandem testing: center zone Fig. 10b Tandem testing: center zone | 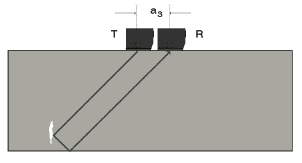 Fig. 10c Tamden testing: lower zone F Fig. 10c Tamden testing: lower zone F |
Often in thick-walled test objects, in which there are vertical discontinuities, this condition cannot be fulfilled so that the reflected sound waves from the discontinuity and the surface of the test object do not return to the probe. In this case, a second probe is used for receiving the reflected portions of sound thus enabling detection of the discontinuity.
With this type of testing, the Tandem Technique, one probe is used as a transmitter, and the other probe is used as the receiver. Both probes are moved over the surface of the test object and are spaced apart at a fixed distance. Scanning is made for vertically positioned discontinuities at different depths of the test object, depending on the probe spacing, Figs. 10a, 10b and 10c.
Although, with angle scanning in thin test objects, there is a possibility that plane discontinuities cannot be vertically hit, Fig. 11 a, the detection sensitivity is much better, especially by suitable selection of the scanning angle and the test frequency so that the user favours the single probe test as opposed to the more complicated tandem method. This is normally the case when testing welds up to a thickness of about 30 mm.
Of course the possibility of detecting discontinuities which are not vertically hit is reduced. However, this deficiency is often compensated by an additional test with another angle of incidence, Fig. 11 b, or by using a probe with a lower frequency, Fig. 11 c. A typical procedure can be found in the corresponding specifications (test instructions) for weld testing.
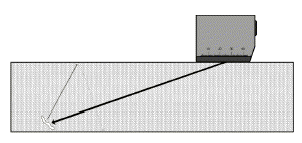 Fig. 11a 70° scanning: unfavourable angle Fig. 11a 70° scanning: unfavourable angle | 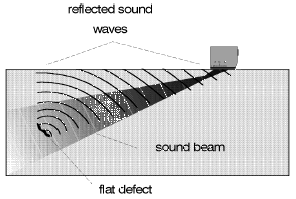 Fig. 11c 70° scanning with 2 MHz; detection by large divergence of the sound beam Fig. 11c 70° scanning with 2 MHz; detection by large divergence of the sound beam |
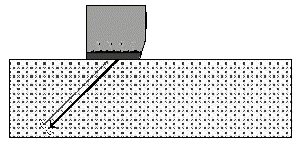 Fig. 11b 45° scanning: favourable angle Fig. 11b 45° scanning: favourable angle |
Method of testing and instrument technology
The ultrasonic flaw detector
Before we concern ourselves with further test tasks and their solutions, we must firstly acquire more detailed knowledge about the most frequently applied ultrasonic technique, including test instruments and probes. Based on what has already been stated concerning the location of discontinuities, we must transmit short sound pulses into the test object in order to measure the sound pulse’s time of flight from the probe to the reflector and back. This is only possible when there is a clearly defined start time and target time. As long as the test object’s sound velocity is known it is then possible to determine, using simple calculation, the distance of the reflector and thus its exact position in the test object, Fig. 12.
Sound reflections in the audio range are called echoes (think of the yodeler in the mountains). Therefore why should we not use this short appropriate term for the reflection of an ultrasonic pulse? Thus the name of the method came into being which is applied in most areas of application for material testing with ultrasonics: the Pulse Echo Method, Fig. 13.
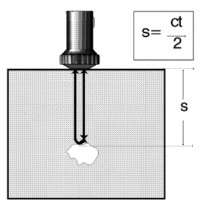 Fig. 12 The priciple of time of flight measurement Fig. 12 The priciple of time of flight measurement | 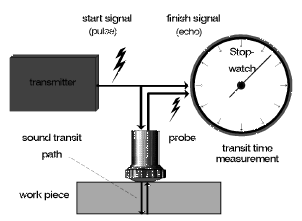 Fig. 13 Block diagram: Pulse Echo Method Fig. 13 Block diagram: Pulse Echo Method |
The time measurement starts with the electrical transmission pulse, the initial pulse. This is an extremely short electrical discharge which triggers a sound pulse at the probe crystal. This pulse travels through the material and is reflected by a discontinuity or the opposing wall and returns back to the probe. The received oscillations are converted into an electrical pulse which stops the time measurement. The distance to the reflector can now be instantly determined by the following formula:
| s = sound path [mm]c = sound velocity [km/s]t = time of flight [ms) |
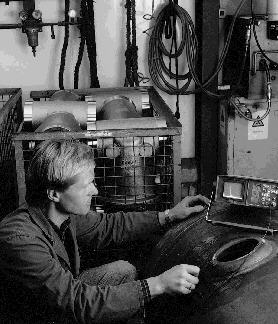 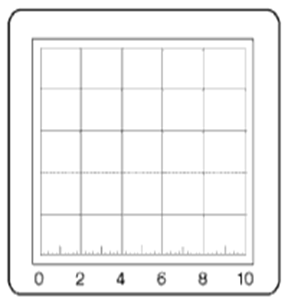 Fig. 14 Ultrasonic Testing in practice Fig. 15 The Display scale Fig. 14 Ultrasonic Testing in practice Fig. 15 The Display scale |
If the time of flight is graphically displayed then we are not far from the universal Ultrasonic Flaw Detector, Fig. 14. In order to evaluate the visual signals (echoes) on the screen there is a grid on the inside of the CRT. The exchangeable attachment scale, which has a horizontal scale with 10 graduations is called the display scale, Fig. 15. Using this scale, the ultrasonic operator is able to measure echoes on the display.
How is this done? As already stated, the electrical transmission pulse triggers the sound pulse at the probe crystal. At the same time this voltage pulse is feed to the input of the amplifier so that the high voltage causes a vertical deflection of the display sweep, this is called the initial pulse, Fig. 16a. With this initial pulse, the sweep starts in the lower left corner of the display synchronous to the start of the sound pulse in the test object and moves along the base line at a constant speed to the right, Fig. 16b.
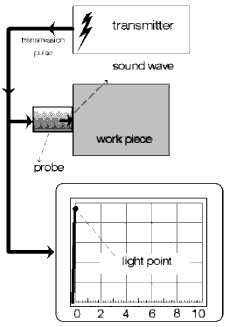 Fig. 16a Initial pulse = Start Fig. 16a Initial pulse = Start | 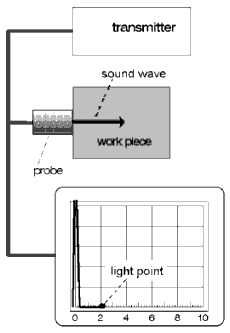 Fig. 16b after 10 ms Fig. 16b after 10 ms |
The speed of the pulse is dependent on the material of the test object (sound velocity = material constant). The sweep speed of the instrument’s display can be varied within wide limits. Thus the speed of the display sweep can be exactly matched to the sound velocity. In our example the electron beam reaches scale division 4 while the pulse is at the opposing side of the test object, Fig. 17 a, then it will of course need the same time to return, i.e. the beam spot will be at the 8th scale graduation, Fig. 17 b.
The part of the sound pulse, which is transmitted through the couplant and into the probe, generates a small electrical reception signal at the crystal which, via the amplifier, causes vertical deflection of the beam spot, this is the backwall echo Fig. 18.
 Fig. 17a Beam spot at the 4th scale graduation Fig. 17a Beam spot at the 4th scale graduation | 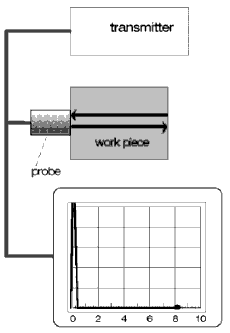 Fig. 17b Beam spot at the 8th scale graduation Fig. 17b Beam spot at the 8th scale graduation | 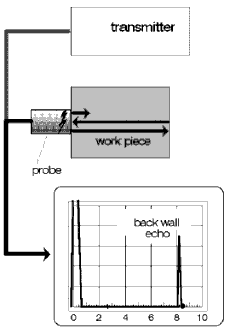 Fig. 18 Backwall echo at the 8th scale graduation Fig. 18 Backwall echo at the 8th scale graduation |
The deflection takes place quickly because the sound pulse is short, therefore can only trigger a short voltage pulse at the probe crystal. The electron beam returns quickly back to the base line and continues to the right, whilst the largest part of the sound pulse is reflected at the coupling surface and travels through the test object a second time. The display indications can now be allocated into two measurement values:
1. Horizontal position.
2. left flank of the echo at the 8th scale graduation
3. Vertical amplitude:
4. 70% screen height
At the moment this does not tell us very much, however, later we will see that nearly all usable results which we obtain from ultrasonic testing are based on these two readings. Let us take a look more closely at the current result: The high initial pulse starts at the left in front of the scale zero point. The rising flank corresponds to the time at which the electrical signal is on the crystal and starts the sound pulse. However, before it is fed to the surface of the test object it must travel through the protection layer of the probe (probe delay). Although it is relatively thin, a short period of time is required. The initial pulse is exactly shifted to the left by this period of time, Fig. 19a.
 Fig. 19a Straight-beam probe: initial pulse delay Fig. 19a Straight-beam probe: initial pulse delay | 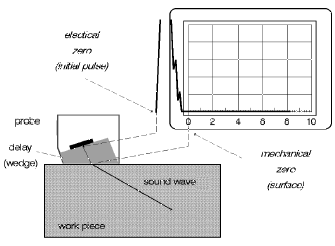 Fig. 19b Angle-beam probe: initial pulse delay Fig. 19b Angle-beam probe: initial pulse delay |
With angle-beam probes the sound pulse in the probe must travel through a much longer delay path made of perspex before it is transmitted into the test object. Depending on the type of probe, the initial pulse delay can be so large that it no longer appears on the display, Fig. 19 b. We already explained the echo at the 8th scale graduation before: It is the pulse reflected at the opposite wall of the test object, the backwall echo. Now it is not too difficult to guess how the display changes when there is another reflector within the sound beam, e.g. a material separation: between the initial pulse and the backwall echo another echo will appear, caused by partial reflection of the sound wave on a discontinuity, Fig. 20.
Such an echo is called an intermediate echo. It is easy to foresee the position changes of the intermediate echo on the display if the reflector is at different depths. Fig. 21 a+b: the position of the intermediate echo on the display in relation to the position of the backwall echo behaves the same as the distance of the discontinuity related to the total thickness of the test object. We already know a method of determining the distance of an internal flaw; the ultrasonic tester speaks of location of the discontinuity.
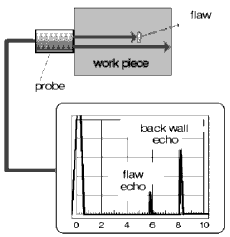 Fig. 20 Test object with discontinuity, display with flaw echo Fig. 20 Test object with discontinuity, display with flaw echo |  Fig. 21a Discontinuity in front of the backwall Fig. 21a Discontinuity in front of the backwall |  Fig. 21b Discontinuity near the surface Fig. 21b Discontinuity near the surface |
Near resolution
So, what can we do when a small discontinuity is just below the surface of the test object, i.e. directly in front of the probe? Can this discontinuity still be detected? The answer is no, because the intermediate echo is now within the initial pulse, it is therefore covered by it. Probably there are also no further indications that there is a near-to-surface discontinuity here, Fig. 22.
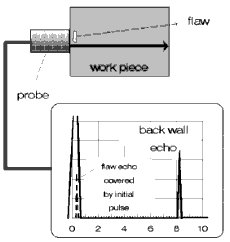 Fig. 22 A non-detectable near-to-surface discontinuity Fig. 22 A non-detectable near-to-surface discontinuity | 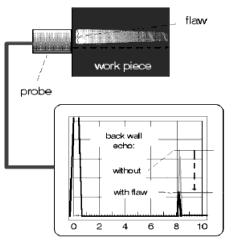 Fig. 23 Shadowing of the backwall echo by a larger near-to-surface reflector Fig. 23 Shadowing of the backwall echo by a larger near-to-surface reflector |  Fig. 24 Echo sequence of a near-to-surface discontinuity Fig. 24 Echo sequence of a near-to-surface discontinuity |
Or do we perhaps have a clue which will lead us to the unseen intermediate echo (a near-to-surface discontinuity)? The answer is yes, when the discontinuity is large enough and shadows a noticeable part of the sound beam so that the backwall echo becomes smaller, Fig. 23. If the near-to-surface discontinuity is also smooth and parallel to the surface, then there is an echo sequence which is more or less well formed because the pulses are reflected many times between the surface and the discontinuity, Fig. 24.
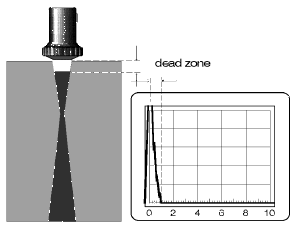 Fig. 25 Dead zone: display, test object Fig. 25 Dead zone: display, test object |
In this case, the amplitudes of the echoes become smaller as the distance increases. The more dense the flat echoes advance to the surface, the more the echoes of the echo sequence disappear into the initial pulse, this causes the echoes to become even more dense. In such cases there is a limit to detection.
From everything, we see that the initial pulse is not welcome on the display, however it is a technical necessity: it limits the detectability of near-to-surface discontinuities. Reflectors in the dead zone, the non-testable area immediately beneath the surface, can no longer be detected, Fig. 25. The dead zone is dependent on the test setup, this means from the probe and the test instrument. However, it can be minimized by suitable selection of the testing device.
The probe
Probes whose beams are normal to the surface are called straight-beam probes, Figs. 1a and 26. Most standard straight-beam probes transmit and receive longitudinal waves (pressure waves). The oscillations of such a wave can be described by compression and decompression of the atoms propagating through the material (gas, liquid and solid), Fig 27.
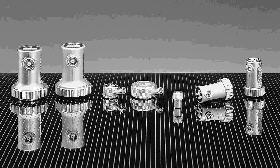 Fig. 26 Straight beam probe Fig. 26 Straight beam probe |
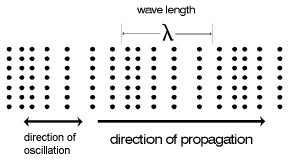
Fig. 27 Longitudinal wave
There is a large selection of straight-beam probes in various sizes and range from frequencies of approximately 0.5 MHz to 25 MHz. Distances of over 10†m can be obtained thus enabling large test objects to be tested. The wide range enables individual matching of probe characteristics to every test task, even under difficult testing conditions. We have already mentioned a disadvantage of straight-beam probes which, under certain conditions, can be decisive: the poor recognition of near-to-surface discontinuities due to the width of the initial pulse.
Probes whose beams enter at an angle are called angle-beam probes because they transmit and receive the sound waves at an angle to the surface of the test object, Figs. 1b and 28. Most standard angle-beam probes transmit and receive, due to technical reasons, transverse waves or shear waves. With a transverse wave the atoms or molecules oscillate vertical to the wave’s direction of propagation, Fig. 29, due to the fact that excitation is made by shear force (transverse to the propagation’s directive forces).
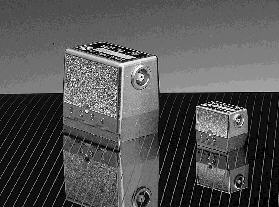 Fig. 28 Angel-beam probes Fig. 28 Angel-beam probes |
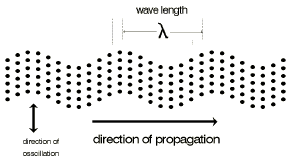
Fig. 29 Transverse wave
Transverse waves only occur in solid materials never in liquids or gases because these do not have a shear modulus and therefore do not effect any shear forces. In addition to this, they propagate much slower than longitudinal waves in the same material. There is no quick reply to the question about why angle-beam probes do not transmit longitudinal waves. In this case a detailed examination is required.
Refraction and mode conversion
Inclined sound waves are almost exclusively generated so that they occur at an angle to the probe/test object interface, Fig. 1b. This is simply achieved by cementing the element onto a wedge shaped delay path which is normally made of perspex. If a longitudinal wave, at a fixed angle of incidence (the wedge angle), hits the perspex/steel interface then this wave is firstly split-up into a reflected and a transmitted wave, Fig. 30a. Reflected waves obey the reflection law (angle of incidence = angle of reflection) and transmitted waves the refraction law (Snell’s law):
 | a = angle of incidenceb = angle of refractionc 1 = sound velocity in medium 1c 2 = sound velocity in medium 2 |
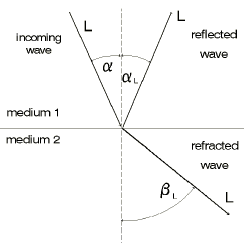 Fig. 30a Refraction and reflection without transverse waves Fig. 30a Refraction and reflection without transverse waves | 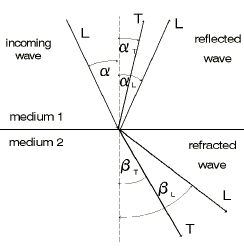 Fig. 30b Refraction and reflection with transverse waves Fig. 30b Refraction and reflection with transverse waves |
 Fig. 31 Evaluation: one echo – two possible reflector locations Fig. 31 Evaluation: one echo – two possible reflector locations |
Moreover something strange happens: In addition transverse waves are created at the sound beam’s point of impact, Fig. 30b. This happens with reflection as well as with refraction! Due to the fact that the transverse waves propagate at around only half the sound velocity of longitudinal waves, other propagation directions are automatically produced due to the refraction law, i.e. reflection and refraction angles.
If, with inclined scanning, this wave conversion is not taken into consideration, then location and evaluation of discontinuities is not possible in many cases, even detection becomes questionable because one echo on the display leads to two different reflector locations depending on whether one takes longitudinal waves or transverse waves as a basis, Fig.31.
But where is the discontinuity? A clear answer can only be given by the operator when one of the wave modes does not occur. That is undoubtedly the precondition for the universal application of angle-beam probes. This precondition can be derived from the refraction law: firstly we recognize that the refraction angle of longitudinal waves is for steel approximately twice as large as that of the transverse waves, Fig. 30b.
With further enlargement of the angle of incidence the angle of refraction balso increases until finally, at an angle of incidence of a = 27.5° (1st critical angle) , the longitudinal wave, with an angle b of 90°, is refracted. This means that it runs along the interface whilst the transverse wave is still transmitted into the test object, Fig 32a.
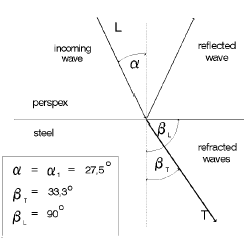 Fig. 32a Refraction: 1st critical angle Fig. 32a Refraction: 1st critical angle | 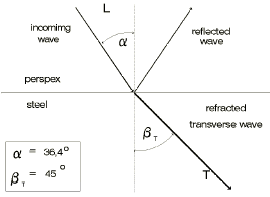 Fig. 32b Refraction: transverse wave under 45° Fig. 32b Refraction: transverse wave under 45° |
Our precondition for clear reflector evaluation is fulfilled: now only one sound wave occurs in the test object, this is the transverse wave with a refraction angle of 33.3° (for perspex/steel). With further enlargement of the angle of incidence various refraction angles of the transverse wave (= beam angle) can be set, e.g. exactly 45°, Fig. 32 b. Finally, with an angle of incidence of about 57° (2nd critical angle) , the transverse wave, with an angle of 90°, is refracted and propagates along the surface of the test object, it then becomes a surface wave, Fig. 32 c.
That is the limit over which no more sound waves are transmitted into the test object. Total reflectionstarts from here, Fig. 32d. The area in which an angle of incidence is present between the 1st and 2nd critical angle (27.5° – 57°) gives us a clear evaluable sound wave in the test object (made of steel), namely the transverse wave between 33.3° and 90°, Fig. 33.
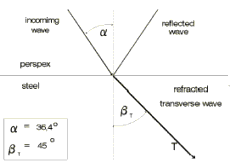 Fig. 32c Refraction: 2nd critical angle, surface wave Fig. 32c Refraction: 2nd critical angle, surface wave |  Fig. 32d Total reflection Fig. 32d Total reflection | 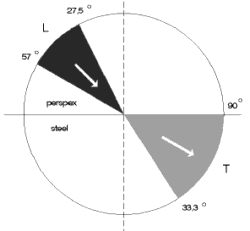 Fig. 33 Usable range for angle-beam probes in steel Fig. 33 Usable range for angle-beam probes in steel |
Characteristics of angle-beam probes
Due to the fact that steel is tested in most applications, the angle-beam probes are designed so that suitable angles of incidence are produced in steel. To achieve clear evaluation there are angle-beam probes with angles of 35°, 45°, 60°, 70°, 80° and 90° (surface waves), Fig. 33.
Angles of 45°, 60° and 70° are mostly used. With regard to frequency, angle-beam probes do not have such a wide selection as straight-beam probes. This is primarily due to the fact that high frequency transverse waves in non-alloyed fine grain steels are subjected to high attenuation. As the sound energy of the waves travels through the material it is so strongly absorbed and scattered that only relatively small test objects can be tested with sufficient sensitivity.
If discontinuities have to be detected over larger distances (in thicker test objects) then angle-beam probes with larger crystals and lower frequencies are to be used; e.g. a reflector with a size of 2 mm in low alloyed fine grain steel with a 2 MHz angle-beam probe with a large crystal can be detected up to a distance of 700 mm. The near resolution of angle-beam probes is often better than with straight-beam probes because the initial pulse is shifted far to the left due to the relatively large perspex delay path. The falling flank of the initial pulse could sometimes still cover near-to-surface discontinuities. Figs. 34a+b show, when using an angle-beam probe, how a near-to-surface drilled hole (1 mm deep) can be reliably detected.
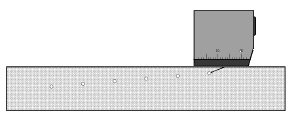 Fig. 34a Scanning a 1 mm transverse hole at a depth of 1 mm Fig. 34a Scanning a 1 mm transverse hole at a depth of 1 mm | 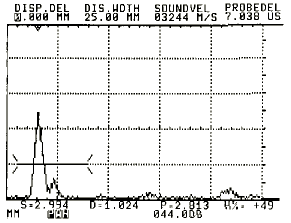 Fig. 34b Detection of a hole with a MWB70-4E Fig. 34b Detection of a hole with a MWB70-4E |
The TR probe
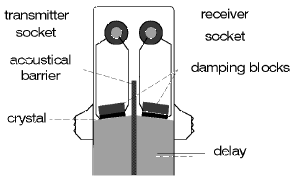 Fig. 35 TR probe: section Fig. 35 TR probe: section |
If you want to obtain a similarly good near resolution with straight-beam scanning you should use a TR probe, Fig. 35. This technique uses two crystal elements which are acoustically and electrically separated from each other in the same housing. In addition to this, both elements are stuck to a relatively long delay path (made of perspex) and are slightly inclined towards each other. Connection of the TR probe on the instrument is made in the TR or dual mode, i.e. one element is connected to the transmitter and the other with the input of the receiver amplifier. The initial pulse is positioned far left of the display due to the long delay path, Fig. 36.
Multi-reflections within the delay path of the transmitter do not interfer because the transmitter element does not have any reception function. Only when the sound pulses come out of the test object and into the receiver element of the TR probe do evaluatable echoes appear on the display.
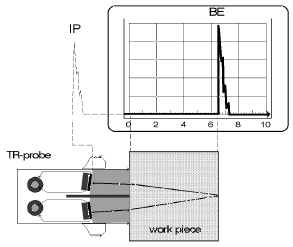 Fig. 36 TR probe on the test object: CRT with backwall echo Fig. 36 TR probe on the test object: CRT with backwall echo | 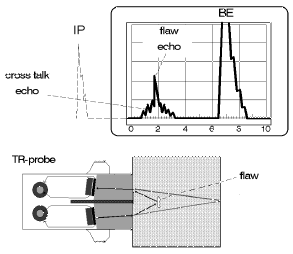 Fig. 37 TR probe on the test object: discontinuity echo in the cross-talk echo Fig. 37 TR probe on the test object: discontinuity echo in the cross-talk echo |
The electrical and acoustic separation is, due to technical reasons, not completely possible. Especially high gain adjustments and rough test object surfaces cause portions of sound to be directly transferred from the transmitter to the receiver. This generates an interference echo on the display which is called the cross-talk echo. The cross-talk echo can exactly cover the near-surface area of the test object and once again there is a loss in detection sensitivity, especially of small discontinuities. However, most cross-talk echoes are so small, or even negligible, that they can be clearly distinguished from possible discontinuity echoes, Fig. 37.
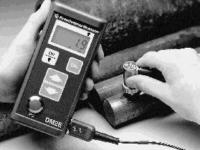 Fig. 38 Wall thickness measurement with a digital thickness gauge in practice Fig. 38 Wall thickness measurement with a digital thickness gauge in practice |
TR probes are therefore ideally suited for the detection of near-to-surface discontinuities and for thickness measurements on thin test objects. The TR probe reacts considerably less sensitive to coupling variations which may be caused by rough or curved material surfaces. This characteristic explains why TR probes play a valuable part in the chemical and energy generating industries: they are ideal for testing all types of tubes and containers, for the detection of discontinuities in tube walls, and for measurements of inside corrosion and remaining wall thicknesses. Special high temperature probes are even able to measure the wall thickness on test object surfaces up to about 550°C so that installations can be tested during operation.
5. Locating discontinuities
Calibration of the instrument
The location of a discontinuity can be instantly determined using its echo if the instrument is correctly calibrated. Calibration means, linear display, from the zero point on the scale, of a certain distance range of the object to be tested. The zero point on the scale corresponds to the surface of the test object and the 10th scale graduation the maximum distance, e.g. 100 mm steel, 10 mm aluminum, 25 mm brass etc. When specifying the calibration range the naming of the material is also important because the displayed distance of the echo, sound path s, is always deduced from the time of flight t of the pulse and the sound velocity c according to the equation:
| s = sound path [mm]c = sound velocity [km/s]t = transit time [ms] |
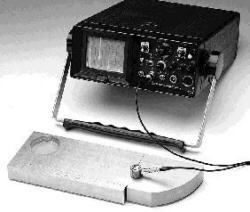 Fig. 39 USK 7: Backwall echo sequence with a straight-beam probe Fig. 39 USK 7: Backwall echo sequence with a straight-beam probe |
This relationship is not unimportant for the ultrasonic operator but it is not required for the sequence of calibration. The rule simply says: Use a work piece of the same material as the test object whose dimensions are known. By coupling the probe onto an object of known thickness t an echo sequence appears on the display, Fig. 39. The associated sound paths correspond logically to the paths being travelled in the test object, for example with a straight-beam probe it is the multiple of the test object’s thickness t, therefore:
○ 1st Echo = t,
○ 2nd Echo = 2t,
3rd Echo = 3t, etc.
We must now adjust 2 of these echoes on the corresponding scale graduation to the required calibration range. The instrument is then calibrated, i.e. by reading off the scale position T the sound path s (distance) of the associated reflector can be determined (location of reflectors, wall thickness measurement).
Calibration with a straight-beam probe
The reference piece used for calibration is called the Calibration Block, or Standard Calibration Block, if the block used is standardized. The Standard Calibration Block 1, also simply referred to as V1 block (according to BS 2704 – A2), has a thickness of exactly 25 mm and is made of low-alloyed fine grained steel so that it can be used for nearly all types of calibration when similar steels are to be tested.
Example 1: Calibration range 100 mm steel (longitudinal waves)
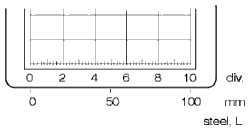 Fig. 40 Calibration range: 0-10mm Fig. 40 Calibration range: 0-10mm |
The 10 scale graduations on the horizontal display scale are to have a range of 0 to 100†mm steel, Fig. 40. One scale graduation therefore corresponds to 10 mm in the test object. We say: the scale factor k (display scale) is 10 mm per scale graduation. We couple the straight-beam probe to the V1 block (laying flatwise), Fig. 39. The backwall echo sequence now comes from the 25 mm steel path. The allocation of sound paths si to the corresponding scale positions Tiis carried out using the calibration table:
| Echo-Noi | Sound path si[mm] | Scale factor k[mm/scale grad.] | Skalen-position Ti[scale grad.] |
| 1 | 25 | 10 | 2.5 |
| 2 | 50 | 10 | 5.0 |
| 3 | 75 | 10 | 7.5 |
| 4 | 100 | 10 | 10.0 |
The corresponding scale position Ti is calculated by using the formula:
 | si = sound path of umpteenth echoesTi = scale position of the umpteenth echok= scale factor |
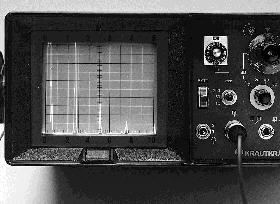 Fig. 41 USK 7: Calibration in the 100 mm range Fig. 41 USK 7: Calibration in the 100 mm range | 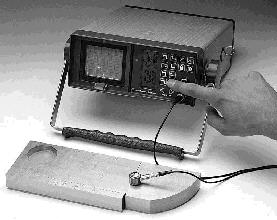 Fig. 42 USK 7 D: Consideration of the probe delay Fig. 42 USK 7 D: Consideration of the probe delay |
The exact adjustment of echoes from the calibration block, as in Fig. 41, is made with analog ultrasonic flaw detectors using the controls pulse shift (or delay) as well as coarse and fine ranges. In doing this, the adjustments must be alternately carried out at these points until the echo flanks are at the correct scale positions. With modern digital instruments the calibration range of 100 mm and the sound velocity of 5920 m/s are firstly entered. After coupling the probe to the calibration block, the function delay or probe delay is changed until the echoes are correctly positioned, Fig. 42.
Example 2: Calibration range of 250 mm in aluminum
10 scale graduations correspond to 250 mm in aluminum: k = 25 mm/graduation. We couple the straight-beam probe to an aluminum test block which is 80 mm thick, i.e. a backwall echo sequence is produced from this thickness (t = 80 mm), Fig. 43.
The calibration table now looks like this:
| Echo-Noi | Sound path si[mm] | Scale factor k[mm/scale grad.] | Skalen-position Ti[scale grad.] |
| 1 | 80 | 25 | 3.2 |
| 2 | 160 | 25 | 6.4 |
| 3 | 240 | 25 | 9.6 |
Exact reflector location is only possible after correct calibration of a test instrument. The ultrasonic operator moves the probe over the test object. In a normal case, i.e. when a discontinuity does not exist, only the initial pulse and the backwall echo are visible on the display. As soon as a discontinuity is within the area of the sound beam, an additional echo appears between the initial pulse and the backwall echo, Fig. 44, e.g. an echo at scale graduation 1.4. With calibration in the 250 mm range the distance to the reflector s is therefore 1.4 x 25 = 35 mm.
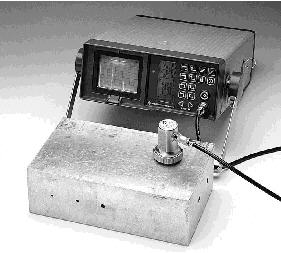 Fig. 43 USK 7 D: Calibration of a 250 mm range with an 80 mm aluminum path Fig. 43 USK 7 D: Calibration of a 250 mm range with an 80 mm aluminum path | 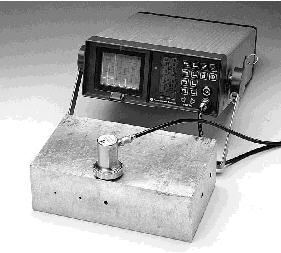 Fig. 44 USK 7 D: Sound path measurement. Fig. 44 USK 7 D: Sound path measurement. |
Calibration with a TR probe
For technical reasons, the calibration with a TR probe can only be made to a certain extent using a backwall echo sequence from a comparison object. Due to the slight angular beaming, Fig. 35, transverse waves occur with the TR probe which cause strong interference behind the 1st backwall echo so that the 2nd backwall echo is often unable to be identified. Therefore, a stepped calibration block is used for the adjustment of both echoes, alternately going between two steps (2 point calibration).
Example 3: Calibration range for 10 mm steel
Step block VW (steel: 1 – 8 mm). The 3 mm and 6 mm steps should be used for calibration. The step selection depends on the depth range of the expected reflectors. Here the echo from 3 mm must be adjusted to the 3rd scale graduation and the echo from 6 mm to scale graduation 6, Fig. 45a+b.
| a) | Firstly, we couple the TR probe to the 3†mm step and use the delay control for adjusting the echo flank to the 3rd scale graduation. |
| b) | Now we couple the probe to the 6 mm step and bring the echo to the 6th scale graduation with the range control. |
| c) | Steps a) and b) are alternately repeated until both echo flanks are exactly on the 3rd and 6th scale graduations, Fig. 45a+b. |
The main application of TR probes are wall thickness measurements, but they are also suitable for the detection of near-to-surface discontinuities, Fig. 46a+b.
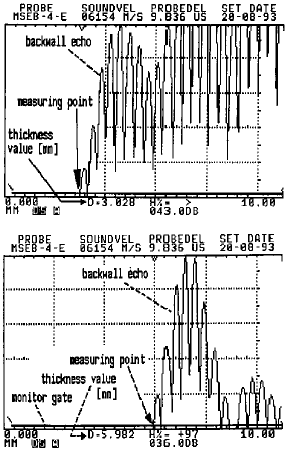 Fig. 45b Calibration echo at the 3rd graduation (top) Calibration echo at the 6th graduation (bottom) Fig. 45b Calibration echo at the 3rd graduation (top) Calibration echo at the 6th graduation (bottom) | 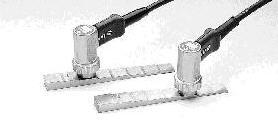 Fig. 45a The two positions (3 mm and 6 mm step) of the TR probe on the stepped calibration block VW Fig. 45a The two positions (3 mm and 6 mm step) of the TR probe on the stepped calibration block VW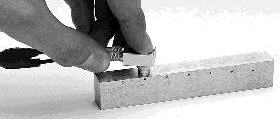 Fig. 46a Probe DA 312 on a speciemen with a side drilled hole in a depth of 1 mm. Fig. 46a Probe DA 312 on a speciemen with a side drilled hole in a depth of 1 mm.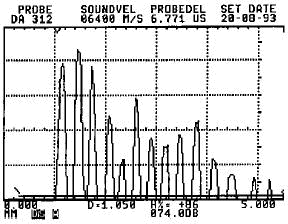 Fig. 46 b Detection of the drill hole from Fig. 46 a Fig. 46 b Detection of the drill hole from Fig. 46 a |
Calibration with an angle-beam probe
For calibration of the test instrument with an angle-beam probe the standard calibration block 1, Fig. 47a, and the calibration block V2 (according to BS 2704 – A4), Fig. 47b, are almost exclusively used because no backwall echo sequence is received due to the angular beaming from a plane-parallel calibration block.
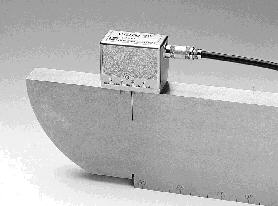 Fig. 47a WB 60-2E on Calibration Block 1 Fig. 47a WB 60-2E on Calibration Block 1 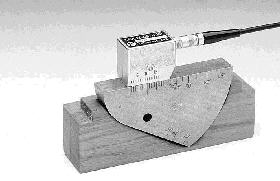 Fig. 47b MWB 45-4E on Calibration Block 2 Fig. 47b MWB 45-4E on Calibration Block 2 | 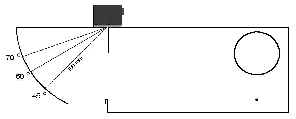 Fig. 48 Different probe angels at V1 block Fig. 48 Different probe angels at V1 block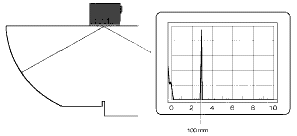 Fig. 49a Sound path in the V1 block without angle reflection Fig. 49a Sound path in the V1 block without angle reflection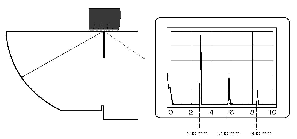 Fig. 49b Sound path in the V1 block with angle reflection. Fig. 49b Sound path in the V1 block with angle reflection. |
The advantage with echoes from the circle segment of the calibration block is that the same sound path is always given independent of the probe angle, Fig. 48. When the angle-beam probe is exactly coupled in the center of the circle segment, a first echo is exactly received from 100 mm out of V1 block. According to the reflection law, the sound waves coming out of the arc are reflected away from the coupling surface to the back, this means away from the arc, Fig. 49a. A second echo out of the arc, needed for the calibration sequence, cannot therefore be produced. For this, there are two saw cuts made in the center of the quarter circle: in the edges, which these saw cuts form with the surfaces, the sound waves are reflected back within themselves due to double reflection (angle reflection effect)so that they go back to the arc, Fig. 49b.
Because the radius of the circle segment is exactly 100 mm we will regularly receive an echo sequence with distances of 100 mm, 200 mm, 300 mm etc. with which we are able to carry out calibration of the test instrument the same way as the straight-beam probe. Fig. 50 shows calibration of the 250 mm range.
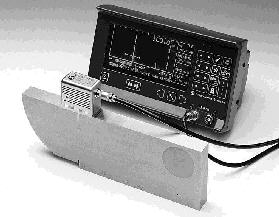 Fig. 50 Range: 250 mm with a WB 60-2 on V1 block Fig. 50 Range: 250 mm with a WB 60-2 on V1 block | 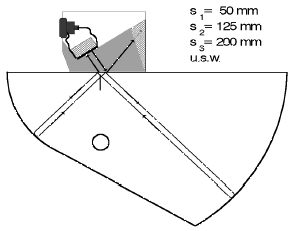 Fig. 51a Path of a sound wave in a V2 block, radius 50 mm Fig. 51a Path of a sound wave in a V2 block, radius 50 mm |
For the miniature angle-beam probe one uses the considerably smaller and lighter Standard Calibration Block 2 (V2 block). This has, as opposed to the V1 block, two circle segments with a common center point, however it does not have saw cuts. The required echo sequence is produced here by the alternating reflection of the sound waves, Fig. 51a+b.
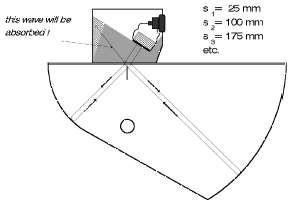 Fig. 51b Path of a sound wave in a V2 block, radius 25 mm Fig. 51b Path of a sound wave in a V2 block, radius 25 mm |  Fig. 52 Range: 100 mm calibrated on V2, radius 25 mm. Fig. 52 Range: 100 mm calibrated on V2, radius 25 mm. |
The corresponding echo sequence is produced according to whether the probe beams into the 25 mm radius or the 50 mm radius. No echoes appear with sound paths by which the sound pulses from the “wrong” direction meet at the center point because these pulses are absorbed by the front damping element of the probe. Fig. 52 shows calibration of the 100 mm range by scanning into the 25 mm radius of Standard Calibration Block V2.
Locating reflectors with an angle-beam probe
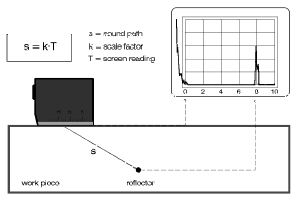 Fig. 53 Scanning a reflector using an angle beam probe Fig. 53 Scanning a reflector using an angle beam probe |
The echo of a discontinuity on the instrument display does not now give us any direct information about its position in the material. The only available information for determination of the reflector position is the scale position and therefore the sound path s, this means the distance of the discontinuity from the index point (sound exit point) of the probe, Fig. 53.
The mathematics of the right-angled triangle helps us to evaluate the Surface Distance and the Depth of a reflector which are both important for the ultrasonic test, Fig. 54a. We therefore now have the possibility to instantly mark a detected flaw’s position on the surface of the test object by measurement of the surface distance from the sound exit point and to give the depth. For practical reasons, the reduced surface distance is used because this is measured from the front edge of the probe. The difference between the surface distance and the reduced surface distance corresponds to the x-value of the probe, this is the distance of the sound exit point to the front edge of the probe, Fig. 54b.
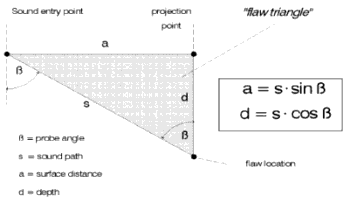 Fig. 54a The flaw triangle Fig. 54a The flaw triangle | 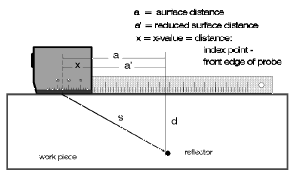 Fig. 54b Reduced surface distances and x-value Fig. 54b Reduced surface distances and x-value |
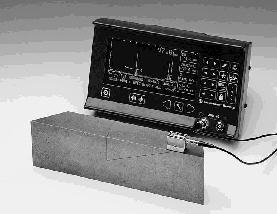 Fig. 55 USN 50: A hole being scanned with the probe MWB 60-4E Fig. 55 USN 50: A hole being scanned with the probe MWB 60-4E |
With ultrasonic instruments having digital echo evaluation these calculations are naturally carried out by an integrated microprocessor and immediately displayed so that the operator does not need to make any more time-consuming calculations, Fig. 55. This is of great help with weld testing because with the calculation of the flaw depth an additional factor must be taken into account, namely: whether the sound pulses were reflected from the opposing wall. If this is the case then an apparent depth of the reflector is produced by using the depth formula which is greater than the thickness T of the test object. The ultrasonic operator must acertain whether a reflection comes from the opposite wall and then proceed with calculating the reflector depth, Fig. 56b.
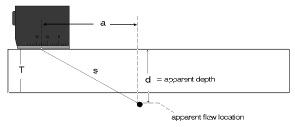 Fig. 56a The apparent depth Fig. 56a The apparent depth | 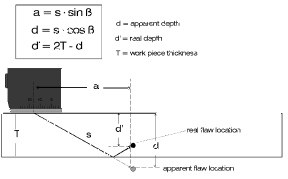 Fig. 56b The real reflector depth after sound reflection Fig. 56b The real reflector depth after sound reflection |
Locating reflectors with an angle-beam probe
The echo of a discontinuity on the instrument display does not now give us any direct information about its position in the material. The only available information for determination of the reflector position is the scale position and therefore the sound path s, this means the distance of the discontinuity from the index point (sound exit point) of the probe, Fig. 53. The mathematics of the right-angled triangle helps us to evaluate the Surface Distance and the Depth of a reflector which are both important for the ultrasonic test, Fig. 54a. We therefore now have the possibility to instantly mark a detected flaw’s position on the surface of the test object by measurement of the surface distance from the sound exit point and to give the depth. For depth of the reflector is produced by using the depth formula which is greater than the thickness T of the test object. The ultrasonic operator must acertain whether a reflection comes from the opposite wall and then proceed with calculating the reflector depth, Fig. 56b.
Evaluation of discontinuities
Of course, a discontinuity is best evaluated when its size (extension) is known. The operator’s wish to accurately know the “real reflector size” is understandable therefore it is expected that an nondestructive testing method, such as ultrasonic testing, give this information. However, due to the fact that on the display only the echo can be interpreted, this means the reflected sound coming from the discontinuity, it is very often difficult, and in some cases even impossible, to reliably assert the size of the reflector. In fact, the echo height plays the decisive part when evaluating discontinuities during manual Ultrasonic Testing.
Scanning method
In ultrasonic evaluation one is frequently able to come near to the true reflector size as long as the discontinuity is large compared to the diameter of the sound field. The discontinuity then reflects the complete impacting energy back, Fig. 57. By scanning the boundaries of the discontinuity, reliable information can be obtained about its extension. The ultrasonic operator normally observes the height of the discontinuity echo. The probe position on the test object at which the echo drops by exactly half indicates that the discontinuity is only being hit by half the sound beam, Fig. 58a.
 Fig. 57 A large reflector in the sound beam Fig. 57 A large reflector in the sound beam | 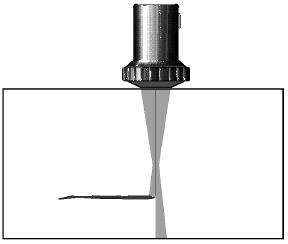 Fig. 58a Straight beam probe on the reflector boundry Fig. 58a Straight beam probe on the reflector boundry Fig. 58b Top view with reflector for extension. Fig. 58b Top view with reflector for extension. |
This means that the acoustic axis is exactly on the boundary of the discontinuity. The probe position is marked and the operator determines further boundry points until a contour of the discontinuity is formed by joining the marked points together, Fig. 58b. Location of the reflector boundry becomes more exact the smaller the diameter of the sound beam is at the reflector position. Therefore, if the reflector extension is to be exactly measured it is recommended that a probe be selected which has its focal point at the same distance as the reflector. TR probes are especially suited which have a hose-shaped sound beam with a small diameter (1 – 3 mm) at their most sensitive depth range.
Evaluation of small discontinuities: The DGS method
A reflector which is completely contained within the sound beam is regarded as a small reflector. If such a reflector is evaluated by scanning then it is not the size of the reflector which is obtained as a result but the diameter of the sound beam! Therefore, the scanning method is not practical in this case. We have noticed previously that the height of a reflector echo will become greater the larger the sound beam area is which covers the reflector. This feasible behaviour can be used on small reflectors: their echo heights increase with their areas, Fig. 59.
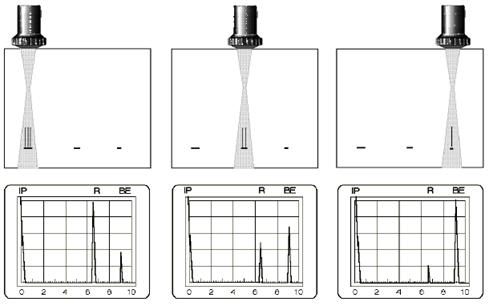 Fig. 59 Reflectors with different areas and their echoes Fig. 59 Reflectors with different areas and their echoes |
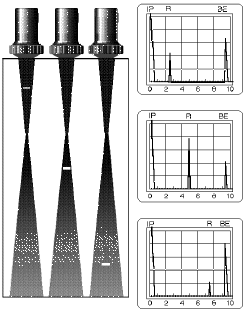 Fig. 60 Reflectors at different depths and their echoes Fig. 60 Reflectors at different depths and their echoes |
Under optimal conditions, e.g. drill holes with flat bottoms and at equal depths, this law can be confirmed:
| The echo heights are proportional to their area or The echo heights are proportional to the square of their diameter. |
Example: The flat-bottom hole with a diameter of 2 mm has an echo which is 4 times that of a 1 mm flat-bottom hole because the area has quadrupled. However, if the echoes from two drill holes at different depths are compared then an additional distance dependence of the echo heights is established, Fig. 60.
With accurate tests using flat-bottom holes at different depths a simple law can be found, at least in the far field of the applied sound beam:
| The echo heights reduce to the square of their distance |
This does not normally apply to the near-field of the sound beam! Here, the test results show that the echo heights within the focus reach their highest amplitude and are reduced again at shorter distances, Fig. 61.
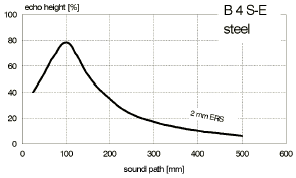 Fig. 61 Distance amplitude curve of a 2 mm – disk reflector Fig. 61 Distance amplitude curve of a 2 mm – disk reflector | 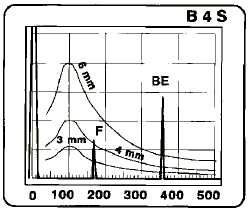 Fig. 62 Evaluation of a discontinuity (F) using evaluation curves. Fig. 62 Evaluation of a discontinuity (F) using evaluation curves. |
If such curves are put on transparent scales having the CRT format then we immediately have the possibility to comparatively evaluate echoes from unknown reflectors and those from natural reflectors, i.e. the echo height of the discontinuity is compared to that of a circular disk. The discontinuity in Fig. 62 reflects the sound waves the same as a circular disk having a diameter of 4 mm. Due to the fact that we can only assess the sound reflected from the discontinuities we must of course not equate the diameter of 4 mm with the “true size” of the discontinuity. We therefore refer to them as anequivalent disk-shaped reflector or as equivalent reflector size (ERS) . The equivalent reflector size only corresponds to the true reflector size of a discontinuity in an ideal case which is when it is circular and exactly hit vertical to the acoustic axis.
In practise this almost never occurs which means that the true size of a discontinuity is normally larger than the equivalent reflector size. A law for this cannot be derived because the echo height is strongly dependent on the characteristics of the discontinuity, this means its geometry, orientation to the sound beam and the surface quality. For example, a pore (spherically shaped gas inclusion) with a diameter of 2 mm has an equivalent reflector size of 1 mm; an angled flat reflector 5 mm long gives, according to orientation, a result of ERS 0 (not detectable) to perhaps ERS 2.
This uncertainty in the evaluation of the discontinuity is however neutralized when other possibilities and techniques in ultrasonic testing are used to inspect detected discontinuities closer. An experienced ultrasonic operator can, without additional expense, accurately give information about the discontinuity which he has detected. Scanning the discontinuity from different directions, assessing the echo shape and the behavior of the display when moving the probe (echo dynamics) are just a few techniques which can be successfully applied.
Despite the remaining uncertainty with evaluation of natural discontinuities the above method of discontinuity evaluation is applied in many countries due to the fact that the method is based on well proven laws in the sound field. It is therefore reproducible, i.e. the evaluation results are independent of testing device and operator.
The socalled DGS scales or discontinuity evaluation can be obtained from the probe manufacturer for many probes and various calibration ranges. DGS means that the scale is allocated an echo at the Distance, with correctly set Gain and (equivalent reflector) Size. However, the modern version of the DGS scale would need some explanation because it was developed to fulfill the requirements of the most common specificationsin practical testing: If, on a certain test object whose purpose and therefore stress values are known, an ultrasonic test is to be carried out then firstly, if necessary with destructive testing, it should be established how large the permitted material flaw should be. Of course, the position of such a flaw in the material and its rate of occurance play a part.
If a permitted flaw size has been determined then this size is multiplied with the safety factor which, amongst others, also takes the evaluation uncertainty of the ultrasonic test into account. The corresponding echo amplitude curve for this size is now of importance for the ultrasonic test. The ultrasonic operator scans the test object with the probe and only needs to record the indications which exceed this recording curve, Fig. 63.
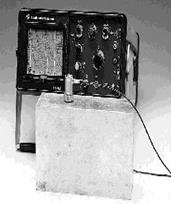 Fig. 63 DGS scale for the probe B 4 S. Fig. 63 DGS scale for the probe B 4 S. | 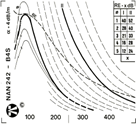 Fig. 64 Discontinuity evaluation with a DGS scale Fig. 64 Discontinuity evaluation with a DGS scale |
Consequently, only one curve is necessary for the evaluation. Due to the fact that, depending on the application, different recording limits occur, it must be possible to allocate other equivalent reflector sizes to this curve. This allocation is shown by a table positioned at the top right of the scale: starting from a defined default setting of the instrument, the auxiliary gain is taken from the table which belongs to the required recording value and added to the gain controls. If the correct range calibra tion has been made then test object scanning can now begin. When an indication from the test object exceeds the recording curve then this result is to be recorded in writing and evaluated. If required, the test instructions provide the following measures: rejection, repair or further tests for exact assessment of the discontinuity (diagnosis) .
Fig. 64 shows testing of a forged part. The recording curve corresponds to Equivalent Reflector Size 3. The detected discontinuity, at a depth of 110 mm, exceeds the curve, i.e. all reflector data must now be recorded into a predetermined form.
Sound attenuation
In addition to the laws which establish the behaviour of disk shaped reflectors within the sound beam of a probe (distance and size laws) another effect can be observed: The sound attenuation. The sound attenuation is caused by the structure of the test object but is also strongly dependent on the frequency and the wave mode of the applied probe. Only when these effects are known can they be considered by the discontinuity evaluation. However, the evaluation becomes more difficult, timeconsuming and more unreliable so that DGS evaluation can be burdened with tolerances which are too great.
The reference block method
These uncertainties in evaluation can be reduced when there is a socalled reference block available which is made of the same material as the object to be tested and which also contains artificial reflectors whose echoes can be directly compared to the discontinuity echoes from the test object. The application of the reference block method is, in practise, made in two different ways:
Comparison of echo amplitudes
The test object is tested with a high gain setting by which the smallest detectable reflector is displayed. An echo indication is peaked, i.e. the maximum echo indication is achieved by careful movement of the probe and the echo peak set by adjustment of the gain to a predetermined height, e.g. 80% CRT screen height (reference height) , Fig. 65.
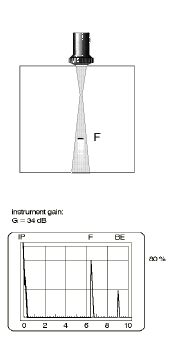 Fig. 65 Test object with a flaw: echo at 80% (reference height) Fig. 65 Test object with a flaw: echo at 80% (reference height) | 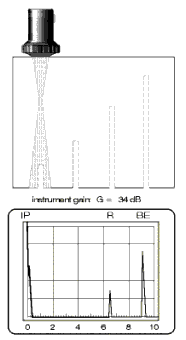 Fig. 66 Reference block: reference echo at 30%. Fig. 66 Reference block: reference echo at 30%. |  Fig. 67 References block: reference echo to reference height Fig. 67 References block: reference echo to reference height |
Using the same settings, the reflector from the reference block is scanned which is approximately positioned at the same distance as the discontinuity, Fig. 66. The quantative unit for evaluation is now the gain change of the ultrasonic instrument which is necessary to set the reference echo to the reference height, Fig. 67.
Result: The discontinuity echo is 8 dB higher than the reference echo because the gain must be increased by 8 dB (from 34 dB to 42 dB).
The recording limit normally corresponds to the echo height of the reference reflector whose size is to be determined, the same as the DGS method, before the ultrasonic test.
Distance amplitude curve
All reflectors in the reference block are scanned before the test, their maximum echo heights marked on the attachment scale of the display and joined by a curve, Fig. 68.
The curve produced is called the Distance Amplitude Curve, or DAC for short. When a discontinuity echo appears, an immediate assessment can be made whether or not the discontinuity echo exceeds the DAC. In addition to this a determination is made, by a corresponding gain change, to see by how many dBs an echo exceeds the curve. This excess recording echo height (EREH) is our reproducible measure for the evaluation and reporting of the discontinuity.
The advantages of the reference block method with a DAC are:
1. that it is no longer necessary to compare each discontinuity echo with the corresponding reference echo from the reference block but to directly make the evaluation with the DAC.
2. that the heavy reference block need not be transported to the testing location.
3. that the recording of a DAC for certain applications is only required once because the curve is documented on a transparency or in the memory of a modern ultrasonic test instrument.
By recording the curve using reflectors in a test object comparable to the work piece, this curve contains all the influences in the test object (distance law, sound attenuation, surface losses). Corresponding corrections are therefore not necessary. Regarding the evaluation results, we must understand here that the effect of the discontinuity (geometry, orientation and surface quality) is not taken a great deal into account the same as the DGS method. Therefore, the result of a discontinuity evaluation with the reference block method has the same uncertainty as the DGS method.
The preference regarding which method to use is subjective. The corresponding national test specifications normally state the test method to be used so that the operator is not able to make his own decision. If no data is available, the test situation should be analyzed in order to decide which method be best used:
Firstly, it must be established whether a reference block exists which corresponds to the test object. If yes, then the test can be carried out simply and reproducibly with the reference block method. If no reference block is available then the DGS method can be used, or a reference block must be subsequently produced comparable to the test object.
However, in many cases the DGS method can be used without difficulty, namely when the test object is made of low alloy steel, has a simple geometry, a low sound attenuation and an even surface quality. The test should be carried out with a narrow band standard probe with a frequency between 1 MHz and 6 MHz for which there is a DGS diagram or a DGS scale.
The new computer controlled instruments normally support the program controlled recording of DACs. With the USD 10 the recorded DAC is automatically converted to a horizontal line. This is known as time corrected gain (TCG) , Fig. 69.
The recording curve is therefore an horizontal line so that the evaluation can be visually and acoustically supported using a monitor gate (flaw alarm), Fig. 70a-c. At the same time for each echo, the excess recording echo height is displayed in dB (DBR value in the measurement line of the USD 10) in addition to the data for discontinuity location.
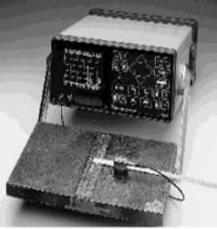 Fig. 70a Weld testing with the USD 10 Fig. 70a Weld testing with the USD 10 | 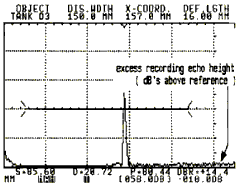 Fig. 70 b A discontinuity to be recorded, DBR 14,4 dB Fig. 70 b A discontinuity to be recorded, DBR 14,4 dB | 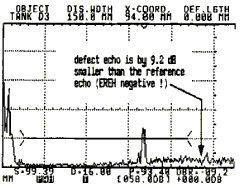 Fig. 70c A discontinuity not to be recorded; DBR -9.2 dB. Fig. 70c A discontinuity not to be recorded; DBR -9.2 dB. |
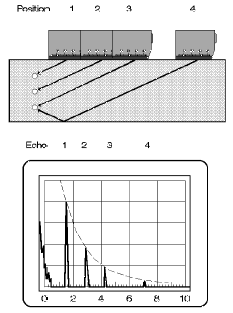 Fig. 68 Reference block wiht side drilled holes and resulting echoes Fig. 68 Reference block wiht side drilled holes and resulting echoes |
 Fig. 69 DAC of the reference echoes (top) and with time corrected gain (bottom). Fig. 69 DAC of the reference echoes (top) and with time corrected gain (bottom). |
Of course, the recorded curves, including the complete instrument settings, can be stored. It is therefore guaranteed that any later tests can be carried out with the same settings. By storing the instrument settings, including the active A-Scans with the discontinuity echo, the operator has all the data available for producing a test report at any time.
Documentation
The higher the value of a test object or the greater the importance of a component with regard to the safety requirements of the complete object, e.g. an aircraft bolt, then the more important the required ultrasonic documentation becomes (product liability) . On the one hand this documentation proves that the test was completely and correctly carried out, and on the other hand enables the test to be repeated at any time under the same conditions (test reproducibilty).
The documentation, the test report of an ultrasonic test, roughly consists of 3 parts:
| a. | Data concerning the test object and the test method. |
| b. | Data concerning the testing device. |
| c. | Results of the test: |
Typical tabular list of all detected and evaluated discontinuities, refer to the example report, if necessary, a drawing of the test object with flaw positions. The operator must record data during the test, especially data of the detected discontinuity. Creation of the actual report is normally made later in the office. The recordings must be frequently supplemented by calculations before the operator transfers them into the report. The creation of a test report very often takes as much time as the actual test itself and should be taken into account when determining test expenditure. Even when working conscientiously, transfer or calculation errors cannot be excluded, especially with large amounts of data.
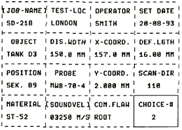 Fig. 71 USD 10: My Choice table with flaw data. Fig. 71 USD 10: My Choice table with flaw data. |
Modern ultrasonic instruments with memory and data transfer functions greatly improve recording of the adjustment data and test results during the test as well as creation of the test report and therefore ease the operator of a burden, who can then concentrate on the test task. By directly storing of all discontinuity data in the instrument, transfer errors can be excluded, position coordinates of the detected discontinuities are entered into the instrument and are therefore contained in the stored data set along with the A-Scan. If required, the documentation can be printed at the test location, Fig. 71.
Individual documentation matched to the test task is carried out with a PC. The possibilities for measurement data processing are as versatile as the programs offered on the market. In order to make the application of data communication with a digital ultrasonic instrument flexible, a utility program is very often used. This is normally a program which is easy to operate and enables reliable data transfer between PC and test instrument.
In addition to this, all stored instrument settings (= Data set) , the corresponding adjustment parameters (= Function lists), the display contents (= A-Scans) as well as the individual parameters can be recalled and stored on a floppy disk or hard disk. Function lists are filed into an ASCII format, A-Scans and LCD menus in normal graphic formats (PCX, IMG). A data set corresponds to a complete instrument adjustment and is saved in a hexadecimal format. This guarantees that by return transfer of the data set to the test instrument exactly the same instrument settings are available. The function lists and graphics are now available to the operator for further use.
Now he is able to use his own program (word processing, database) for individual design of his own test documentation. Instrument settings and display graphics are simply read into his program. This routine work is easily made by a so called Macro. A macro is nothing more than a list of commands belonging to the user program being used and runs automatically thus creating the required documentation. The names of the files to be processed are requested, in dialog, by the operator.
The following report is an example of documentation automatically produced for a weld test. The test was made with the USK 7 D and the indications from the discontinuities stored in the instrument. Finally, all data (function lists and A-Scans) were stored on a disk using the program UltraDoc. The test report was made with a macro from the program WordPerfect 5.1:
Ultrasonic test report
(example referring to AD-Merkblatt HP 5/3)
| Manufacturer | SLV-Duisburg | Weld test | Specimen No. 1 |
| Weld type: | V | Weld preparation: | 30° |
| Welding method: | Covered electrode | Parent material: | ST 52 |
| Added material: | unknown | Test volume: | Weld + HAZ |
| Test surface: | 1,2 (see drawing) | Test surface condition: | evenly rough |
| Weld thickness: | 25 mm | Weld width | 32 mm |
| Weld length | 200 mm | Reference points: | see drawing |
| Misc.: | Evaluation with DGS scale | ||
| Test instrument: | USK 7 D | Calibration range: | 200 mm |
| Sensitivity setting: Probe: | ERS 3 + 6 dB MWB 70 4E | Corrections: Frequency: | + 14 dB transfer loss 4 MHz |
| Angle of incidence: | 70° | Scanning position: | see drawing |
| Standard Calibration block: | V2 | Reference block: | R25/C |
| Couplant: | ZG 5 | Pre-test: | nothing found |
| Test class: | b | Recording threshold: | ERS 3 |
Indications to be recorded:
| No. | Sec. | l1 | lmax | l2 | t | dt | d | Dir | dB | Findings / remarks |
| 1 | 1 | 0 | 20 | 30 | 0 | 4 | 21 | 2 | + 18 | Root crack |
| 2 | 1 | 0 | 30 | 32 | – 1 | 3 | 23 | 1 | + 6 | Root crack |
| 3 | 1 | 166 | 191 | 201 | 0 | 2 | 21 | 2 | + 6 | Root crack |
| 4 | 1 | 163 | 168 | 201 | – 1 | 2 | 22 | 1 | + 2 | Root crack |
| 5 | 1 | – | 126 | – | 2 | – | 19 | 1 | – 8 | Pore/small inclusion near edge |
| 6 | 1 | – | 50 | – | 0 | – | 22 | 6 | – 6 | Transverse crack |
| Test location: | Cologne | Date: | 12.3.1991 |
| Test result: | Repair necessary | ||
| Operator: | J. Smith | Supervisor: | H. Müller |
| Signature: |
Diagnosis of indications (outlook)
As opposed to the tasks of an ultrasonic operator, dealt with up until now, the diagnosis of indications is not only based on measured ascertainable parameters. The interpretation of the echo is an additional task. This interpretation normally requires many years of practical experience including carrying out comparsion tests of ultrasonic findings with the results of a destructive test on a test object which is no longer to be used. Methods for diagnosis of indications as well as signal analysis techniques using auxiliary equipment are outside the bounds of this introduction to ultrasonic testing. For this, there is a range of literature available as well as many special publications which we would like to point out to the reader.
