Introduction
The micromembranes are microelectromechanical system (MEMS) components that accomplish one double role of supporting other components, which are regularly rigid and of providing the necessary flexibility in a microdevice that has moving parts [1–3]. A micromembrane has three significant parts: the mobile plate that is moved in different planes in response of an acting signal, the anchors that connect the flexible structures to substrate, and the hinges that connect the mobile plate to anchors. Micromembranes have their thickness much smaller than in plane dimensions and can be implemented in RF‐MEMS switches, MEMS accelerometer, or in optical applications [3]. The micromembranes are mechanically characterized here by means of their stiffness. Tribological investigations include the adhesion force measurement between micromembranes and their substrate.
The reliability issue concerning on MEMS has been developed in recent years. First step to understand MEMS reliability is to know the failure modes. The failure of a microsystem depends on the behavior of integrated microcomponents. For different MEMS applications, the mechanical flexible microcomponents are integrating on the same structure with electrical, optical, thermal, or magnetic components. In such systems, a multiphysics interaction occurs and the failure of one microcomponent means the failure of all system [4]. The flexible mechanical microcomponents from a MEMS device, such as sensor or actuator, can be a microcantilever, a microbridge, or micromembranes with different geometrical configurations. These structure MEMS are sensitive from mechanical structure point of view to phenomena like creep, fatigue, delamination, wear or adhesion [5].
Two of the main failure causes of micromembranes under large deflections are excessive stress in hinges and the stiction. Stiction is one of the most important and unavoidable failure problems of micromembranes under large deflection. Stiction is the adhesion of contacting surfaces due to surface forces (van der Waals, capillary forces, Casmir forces, hydrogen bridging, and electrostatic forces) [6]. The restorative force (pull‐off force) of a micromembrane from substrate, opposite to the adhesion force, depends on the micromembrane stiffness.
There are several applications which include micromembranes as mechanical flexible component. For example, in a pressure sensor, a capacitive micromembrane deflects when the pressure is applied, changing the distance between electrodes and the capacitance. In optical MEMS, the micromembranes are used as micromirrors supported by hinges with high mobility. In an interferometer, where the laser light brought into the sensor by optical fiber and the light beam crosses a micromembrane, the deformation of micromembrane changes the light properties, and different propagation speed can result in phase shift. Micromembrane surface stress sensors from chemical and biological applications are fabricated from thin gold layer. The molecular interaction between probe and target molecules generates a surface stress on micromembrane. This surface stress causes the structural deflection of micromembrane which generates the capacitance change in electrical sensing [4].
One important parameter characteristic to micromembranes is their mechanical stiffness. The micromembrane stiffness is related to the geometry and material properties. Of micromembranes that are connected by hinges to the anchors, their mechanical stiffness is given by the geometrical and structural characteristics of hinges. Microhinges are utilized as joints in MEMS that provide relative motion between two adjacent rigid links through elastic deformation. The geometrical configuration of hinges has influence on the micromembrane response related to the mechanical stiffness. Hinges are deformed in bending or torsion as a function of the applied force.
This chapter presents a study case of micromembranes supported by serial‐parallel connected hinges. The analysis includes theoretical approach, and numerical analysis of the out‐of‐plane stiffness of micromembranes is followed by experimental tests performed using an atomic force microscope (AFM). Moreover, the adhesion effect between flexible part of micromembranes and substrate is experimentally determined and compared with analytical results. In order to compute the analytical adhesion force, the roughness of the contact surfaces is measured using the AFM taping mode. Discussions and comparison with the other micromembranes supported by other type of hinges with different geometry is included at the end of chapter.
Geometry and dimensions of micromembrane with serial‐parallel connected hinges
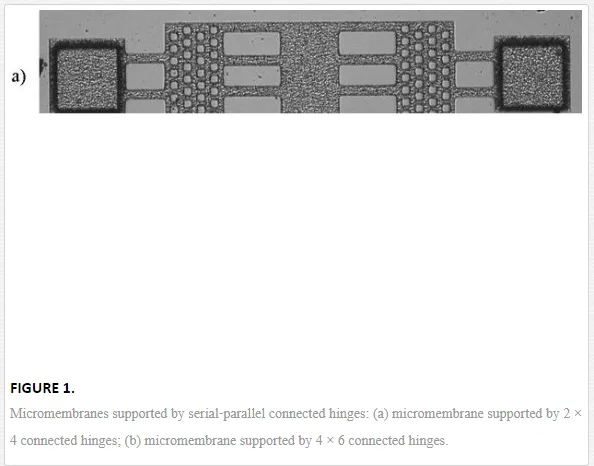
The samples for experimental tests are electroplated gold micromembranes with two different serial‐parallel connected hinges (Figure 1). The flexible part of investigated micromembranes is suspended at 2 μm above a silicone substrate. Gold is the most used material from optical and electrical MEMS applications.
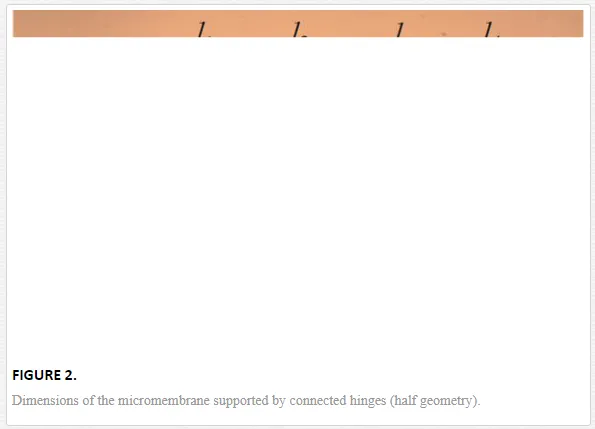
The geometrical dimensions of investigated micromembranes according to Figure 2 are the following:
· lengths: l1 = 65 μm, l2 = 100 μm, l3 = 85 μm, l4 = 50 μm;
· widths: w1 = 18 μm, w2 = 180 μm (Figure 1a), and 288 μm (Figure 1b);
· thickness: t = 3 μm;
· number of hinges n1 is 2 for the first investigated micromembrane and 4 for the second micromembrane (Figure 1a);
· number of hinges n2 is 4 for the first investigated micromembrane and 6 for the second micromembrane (Figure 1b).
Analytical and numerical analysis of stiffness of micromembranes with serial‐parallel connected hinges
Castigliano’s second theorem, known as the displacement theorem, is utilized herein to derive the stiffness of investigated micromembranes and to compute the dependence between force and the sample‐bending deflection. The force is considered to be applied in the mid position of the mobile plate as in experimental investigations [3]. A general formulation is derived here enabling stiffness computation for any combination of serial‐parallel connected hinges. The analytical results of micromembranes with 2 × 4 and 4 × 6 serial‐parallel connected hinges are compared in Section 6 of this chapter, with numerical and experimental results. As a consequence, a bending stiffness expression of micromembranes supported by serial‐parallel connected hinges is obtained as following:

Where

In these expressions, l1, l2, l3, and l4 are the characteristic lengths of hinges and mobile plates (Figure 2), and I1, I2, I3, and I4 are the bending moments of inertia given by the micromembrane thickness and widths and influenced by the number of connected hinges n1 and n2 as:

Using the stiffness expression given by Eq. (1), a theoretical analysis of the number of connected hinges influence on the membrane stiffness is performed (Figure 3). As the number of hinges increases, the stiffness increases respectively.

A numerical analysis of micromembranes stiffness was performed by Finite Element Analysis (FEA) using the static structural module in ANSYS Workbench 13 software. The mesh of the FEA model for the micromembrane with 2 × 4 serial‐parallel connected hinges (Figure 1a) consists of 318,200 nodes and 58,786 hexahedral elements with a size of 2 μm. For the micromembrane with 4 × 6 serial‐parallel connected hinges (Figure 1b), the created mesh has 534,835 nodes and 102,601 hexahedral elements with the same size. Boundary conditions applied on the bottom surface of the anchors correspond to a fixed support. A unitary force (1 μN) is applied in the mid position of the mobile plate, and the out‐of‐plane displacement is simulated. Considering the applied force and the resulting displacement, the bending stiffness is computed. The simulation is performed considering a value of modulus of elasticity equal by 72 GPa [7]. The own weight of the mobile plate upon the hinge deformation is very small and has been neglected.
A maximum displacement of 103.2 nm is simulated of the investigated micromembrane supported by 2 × 4 connected hinges (Figure 4a) that give a numerical stiffness equal by 9.69 N/m. For the investigated micromembrane supported by 4 × 6 connected hinges, an out‐of‐plane displacement of 60.19 nm is obtained (Figure 4b) for a unitary force applied in the mid position of the central mobile plate that gives a bending stiffness equal to 16.61 N/m.

Experimental investigations on stiffness of micromembranes with serial‐parallel connected hinges
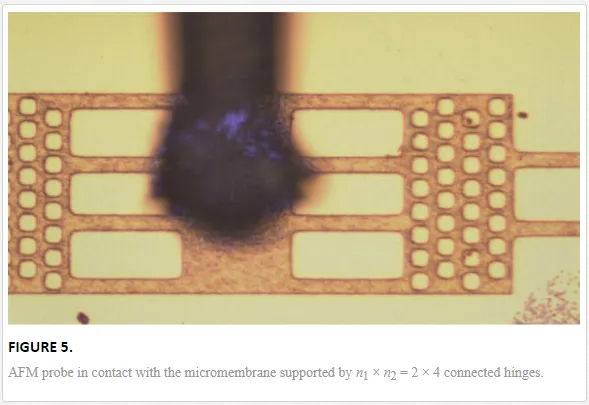
The aim of experimental investigations is to estimate the mechanical stiffness of micromembranes using an atomic force microscope (AFM) type XE‐70 fabricated by Park System Co. The AFM probe used to deflect the micromembranes is TD21562 with a nominal value of the spring constant equal to 144 Nm−1, the radius of tip smaller than 25 nm, the tip height of 109 μm, the length of cantilever 782 μm, and the thickness 24 μm. The tests were performed at room temperature (22°C) and a relative humidity (RH) of 40%. During experimental tests, a mechanical force given by the bending deflection of AFM probe and its stiffness is applied in the mid position of the central plate and deflect it directly to substrate (Figure 5).
During experimental tests, the vertical displacement of the scanning head (Dz) is controlled, and the deflection of AFM probe (DAFM) is optically monitored (Figure 6).
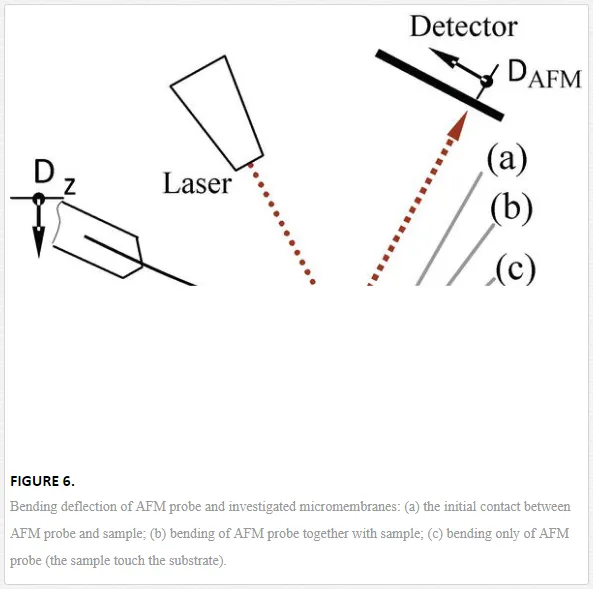
The experimental AFM curve gives the dependence between vertical displacement of scanning head that is controlled by software and the bending deflection of AFM probe detected by a photodetector. The experimental AFM curve has two different slopes (Figure 7). First part of the curve (A and B) from the loading curve (lower curve) corresponds to the bending of AFM probe and samples (position b from Figure 6), and the second part (B and C) is given by the bending only of AFM probe (position c from Figure 6) [3]. In the point B (Figure 7), the sample reaches the substrate. After the point C, the scanning head and the AFM probe are coming to the initial position (the blue curve).

The AFM data from the first part of curve (A and B) are used to estimate the sample deflection (Dz) as the difference between the controlled displacement of the scanning head (Dz) and the detected deflection of AFM probe (DAFM).

The force used in experiment can be determined based on the known stiffness of AFM probe and its bending deflection. This force and the determined deflection of sample given by Eq. (2) are used to compute the sample stiffness as:

The experimental dependence between the sample deflection and the applied AFM force is presented in Figure 8. The slope of this curve gives the micromembrane bending stiffness.
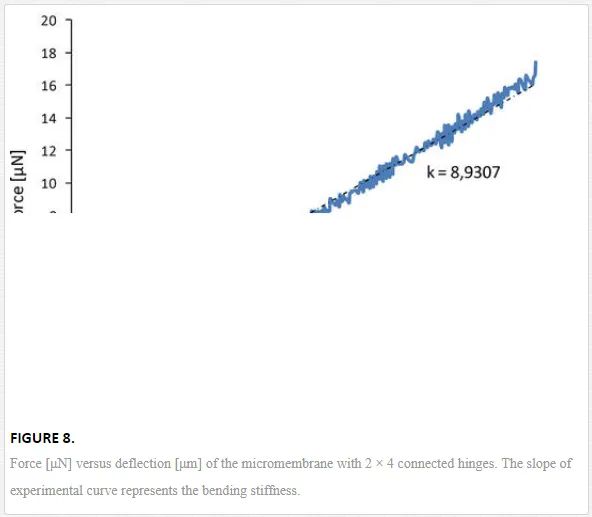
The stiffness of the investigated micromembrane supported by 2 × 4 serial‐parallel connected hinges (Figure 1a) is 8.930 7N/m (Figure 8). The same experiment is performed in order to estimate the stiffness of the micromembrane supported by 4 × 6 serial‐parallel connected hinges (Figure 1b). For this micromembrane, a bending stiffness equal to 18.18 N/m is determined if the force is applied in the mid position of the mobile plate (Figure 5). The tests were repeated several times, and the results of micromembrane stiffness have closed values.
Analysis of adhesion force between micromembrane with serial‐parallel connected hinges and the silicon substrate
Stiction is one of the main failure causes in MEMS, and it occurs when surface forces are too large and, as a consequence, the surfaces brought in contact cannot be separated again. Intensive experimental and theoretical research has been conducted in order to determine the effect of the main factors on the surface forces especially on the adhesion force. For example, the influence of material properties, surface characteristics, and environmental conditions on the adhesion force has been experimentally determined and mathematically validated for several MEMS structures [8].
Researchers have developed several mathematical models for computing the adhesion force by taking into consideration the possible contact types between surfaces. For example, if two surfaces are characterized by high roughness, their contact was approximated by the contact between two elastic spheres (see DMT and JKR models [9]). Another example is the case of the elastic contact between a surface with high roughness and a surface with low roughness. The already mentioned mathematical models can be easily customized for this case [10]. However, the ideal case of elastic contact is rare at micro and nano scale, determining in some cases large differences between experimental and theoretical values. As mentioned in [8], when two surfaces are bought in contact, the highest asperities suffer a plastic deformation. Therefore, in order to correctly estimate the adhesion force between two rough surfaces, a plastic adhesion index has to be computed [8]:

where H is the material hardness, ra is the mean radius of curvature of asperities, σ is the standard deviation of peak heights, ∆γ is the work of adhesion, E* is the equivalent Young’s module given by:

E1,2 are Young’s moduli and ν1,2 are Poisson’s ratios of the two surfaces. The work of adhesion is computed according to [10]:

where γ1 and γ2 are the surface energies of the two materials brought in contact, and γ1,2 is the interface energy of contacting materials and was computed according to [11].
Considering the plastic deformation and assuming an exponential distribution of asperity heights, the adhesion force is expressed as a function of the compression force F as follows

while the total real contact area per unit area is given by

and n is the number of asperities in contact per unit area.
The experimental determination of the adhesion force between the flexible part of the gold micromembrane and the silicon substrate was conducted using the spectroscopy in point mode of the AFM for the micromembrane with 2 × 4 connected hinges (Figure 9).
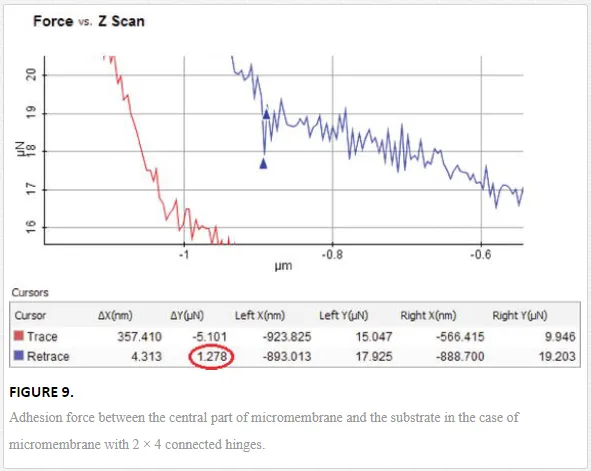
On the unloading AFM curve (Figure 7), the detachment of the micromembrane from substrate is delayed based on the adhesion effect that occurs. This effect gives a jump in the bending deflection of AFM probe that is directly proportional to the adhesion force. A zoom of the experimental AFM curve obtained when performing the spectroscopy in point is illustrated in Figure 9, and the blue part corresponds to the unloading test. In the same figure, the experimental value of the corresponding adhesion force given by the AFM software can be observed, and it is equal to 1.278 μm.
In order to compute the adhesion force, the roughness of the contact surfaces is needed. To perform this step, a micromembrane is cut close to anchor and moved with the backside up to scan the contact surfaces [12]. The topography of the contact surfaces is taken using the tapping mode of AFM. The 3D images for each of the two surfaces that come in contact are provided in Figures 10 and 11, respectively, together with the statistical parameters provided for roughness by the software used for interpreting the experimental data (XEI Image Processing Tool for SPM).

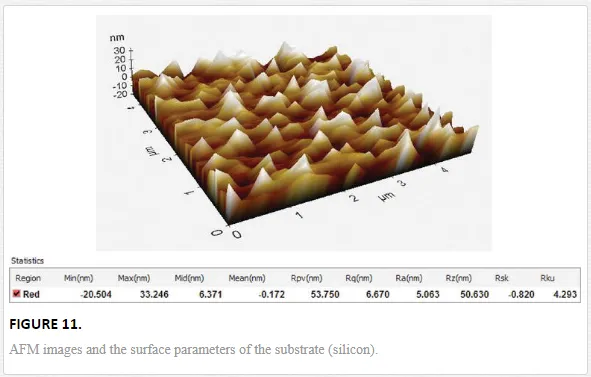
The theoretical value for the adhesion force was obtained using the mathematical model presented above. First, the work of adhesion was computed using a surface energy of 1.51 J/m2 [13] for the silicon substrate and of 1 J/m2 [14] for the gold micromembrane, while the equivalent Young’s module was computed using a value of 150 GPa for Young’s module and 0.17 for Poisson’s ratio for the silicon substrate and a value of 72 GPa for Young’s module and 0.42 for Poisson’s ratio for the gold membrane. Then, the adhesion force was computed for the micromembrane with 2 × 4 connected hinges considering the real contact area between the surfaces. Knowing that the compression force was 17.28 μN, an adhesion force of 1.34 μN was obtained in good agreement with the experimental ones.
Results and discussions
First, using the AFM technique, the effect of geometrical configuration of hinges on the bending stiffness of gold micromembranes was investigated. A method to estimate the out‐of‐plane stiffness by AFM is provided in this chapter, including its validation by analytical and numerical approaches. The mechanical force used to bend the flexible part of micromembrane is given by bending deflection of AFM probe and its stiffness. Second, by considering Castigliano’s deformation theorem, an expression to compute the bending stiffness of micromembranes supported by serial‐parallel connected hinges is provided. Moreover, simulation and finite element analysis is developed using a unitary force applied in the mid position of the mobile plate as in the experiments. The results obtained for out‐of‐plane stiffness in investigated samples are in good agreement as observed in Table 1.
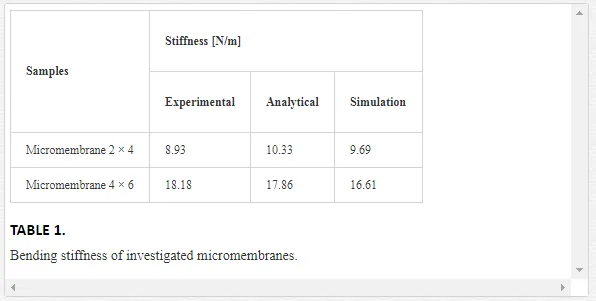
The differences between results are influenced by the accuracy of the experimental tests and the differences of Young’s modulus. In analytical and numerical analysis, a value of Young’s modulus taken from literature is used, and it can differ by its experimental value. Moreover, the analytical model does not consider the influence of the holes from the plates. In any way, the holes have a negligible effect on the samples stiffness as confirmed by numerical analysis. An important influence of the holes can be observed if the micromembranes are dynamically actuated, because the damping given by surrounding medium decreases. Using different serial‐parallel connected hinges to support the flexible part of micromembrane, different mechanical responses can be obtained. The stiffness of samples depends on the number of hinges and their connection.
The adhesion force for the contact between the flexible part and the silicon substrate of the gold micromembrane with 2 × 4 connected hinges was determined both experimentally and theoretically, and the results are in good agreement. The pull‐off force of micromembranes from substrate depends on the adhesion force and the samples stiffness. Adhesion effect is influenced by the roughness of contact surfaces and the operating conditions. The roughness is the same for investigated micromembranes.
Depending on the micromembrane application, different types of hinges can be chosen in order to obtain different stiffness for in‐plane and/or out‐of‐plane movement. The same methodology as presented in Section 3 of this chapter was applied to determine the stiffness of micromembrane with the other types of hinges.
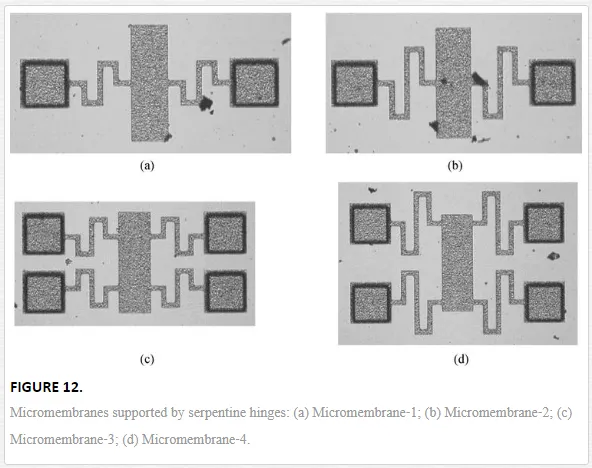
Micromembranes supported by serpentine hinges are characterized by the possibility of in‐plane and out‐of‐plane movements of the mobile plate [15]. Micromembranes supported by two and four serpentine hinges are presented in Figure 12. The number of hinges as well as their length have influence the micromembranes deflection under a mechanical force. Using the AFM tests, the displacement of the central plate is monitored under a mechanical force, and the micromembrane stiffness was determined. As the number of hinges and their length are modified, the stiffness is changed. The micromembrane 1 with two short hinges (Figure 12a) has an out‐of‐plane stiffness equal to 64.4 N/m. If the length of hinges increases for the micromembrane 2 (Figure 12b), the bending stiffness decreases 4.3 times. In the case of the same micromembrane, but supported by four hinges, the stiffness is modified. The micromembrane 3 with four short hinges (Figure 12c) is characterized by a stiffness of 127.5 N/m, and its value decreases five times if the length of hinges increases as in the case of the micromembrane 4 (Figure 12d). It can be noticed that longer hinges ensure more flexibility and the number of hinges multiply the stiffness.
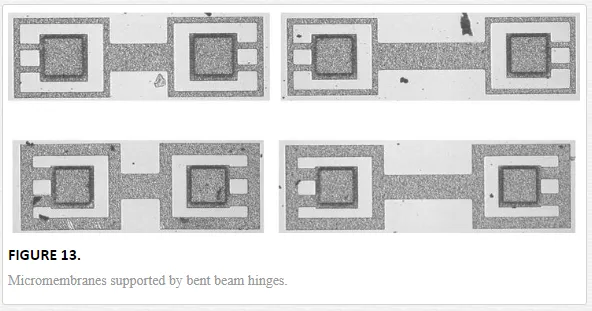
The other investigations using the same AFM method were performed on micromembranes supported by bent beam hinges electroplated with gold in different geometrical dimensions are presented in Figure 13 [16]. The structures are characterized by different widths of hinges and different lengths of the central plate. Stiffness analysis considers fixed anchors and a central force perpendicular to the central plate of micromembranes. Different stiffness of micromembranes can be obtained if the geometrical dimensions are modified. The stiffness of micromembrane increases with the dimensions of hinges and decreases for a longer mobile plate.
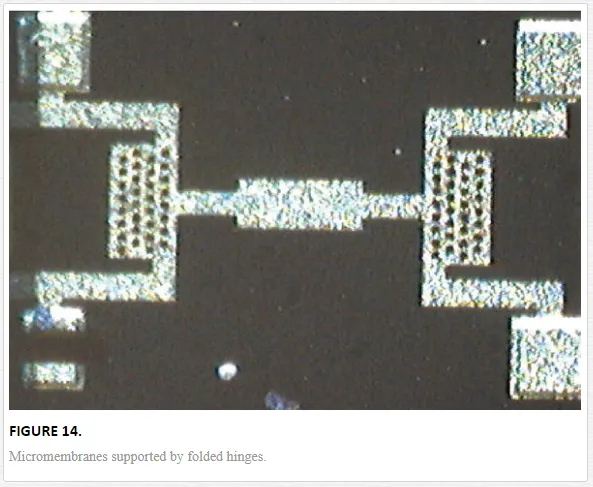
Other example, presented in Figure 14, is a micromembrane supported by folded hinges [3]. The same AFM tests were performed to determine the micromembrane behavior under a mechanical force. The stiffness was experimentally determined and validated by numerical and analytical results. As in the case of investigated micromembrane with serial‐parallel connected hinges, the holes have a small influence upon stiffness under static deflection fact demonstrated by the numerical simulation. The holes have significant effect on the dynamic modulation because the mass of micromembrane is changed and the quality factor given by the air damping is improved [17].
