1) Controllable errors: The sources of error are known and it is possible to have a control on these sources. These can be calibration errors, environmental errors and errors due to non- similarity of condition while calibrating and measuring.
Calibration errors: These are caused due to variation in the calibrated scale from its normal value. The actual length of standards such as slip gauges will vary from the nominal value by a small amount. This will cause an error of constant magnitude.
Environmental (Ambient /Atmospheric Condition) Errors: International agreement has been reached on ambient condition which is at 20C temperature, 760 mm of Hg pressure and 10 mm of Hg humidity. Instruments are calibrated at these conditions. If there is any variation in the ambient condition, errors may creep into final results. Of the three, temperature effect is most considerable.
Stylus pressure errors: Though the pressure involved during measurement is generally small, this is sufficient enough to cause appreciable deformation of both the stylus and the work piece. This will cause an error in the measurement.
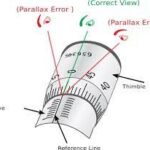
Avoidable errors: These errors may occur due to parallax in the reading of measuring instruments. This occurs when the scale and pointer are separated relative to one another.
The two common practices to minimize this error are
i) Reduce the separation between the scale and pointer to minimum.
ii) A mirror is placed behind the pointer to ensure normal reading of the scale in all the cases. These avoidable errors occur also due to non-alignment of work piece centers, improper location
Of measuring instruments, etc.
2) Non-controllable errors: These are random errors which are not controllable.


