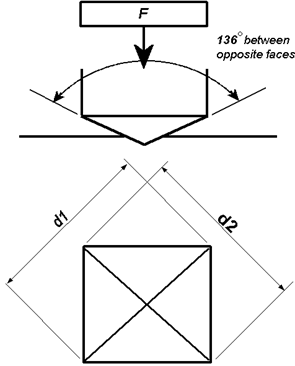
The Vickers hardness test method consists of indenting the test material with a diamond indenter, in the form of a right pyramid with a square base and an angle of 136 degrees between opposite faces subjected to a load of 1 to 100 kgf. The full load is normally applied for 10 to 15 seconds. The two diagonals of the indentation left in the surface of the material after removal of the load are measured using a microscope and their average calculated. The area of the sloping surface of the indentation is calculated. The Vickers hardness is the quotient obtained by dividing the kgf load by the square mm area of indentation.
When the mean diagonal of the indentation has been determined the Vickers hardness may be calculated from the formula, but is more convenient to use conversion tables. The Vickers hardness should be reported like 800 HV/10, which means a Vickers hardness of 800, was obtained using a 10 kgf force. Several different loading settings give practically identical hardness numbers on uniform material, which is much better than the arbitrary changing of scale with the other hardness testing methods. The advantages of the Vickers hardness test are that extremely accurate readings can be taken, and just one type of indenter is used for all types of metals and surface treatments. Although thoroughly adaptable and very precise for testing the softest and hardest of materials, under varying loads, the Vickers machine is a floor standing unit that is moreexpensive than the Brinell or Rockwell machines.

F = Load in kgf
D =Arithmetic mean of the two diagonals, d1 and d2 in mm
HV = Vickers hardness


