Marking out or scribing metals may be performed for laying out the guidelines over the job which might exactly represent the workshop drawing intended for the particular job work. This is a lesson plan on marking out tools for metal.
While carrying out various engineering processes like cutting, measuring, drilling, etc., marking out accurate guidance lines through scribing over the job becomes very important so that the desired operations are implemented flawlessly. Various specifically designed precision marking tools are employed for the above purpose.
The following lesson plan on some of the important marking-out tools for metals provides a comprehensive study regarding the subject, let’s study them one by one:
The Scribing Block

It’s a precision instrument used for accurately marking out lines over metals with respect to a standard parallel true surface. The true surface is formed by a “marking off table” which becomes an integral part of the whole system and is used in conjunction with a scribing block.
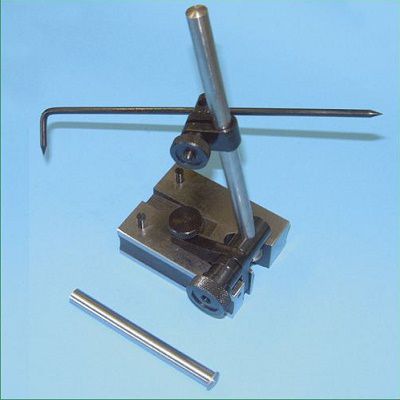
As shown in the figure a scribing block typically consists of a firm pillar holding a scriber, the system being supported by a machine finished precise bottom base.
The base of the tool carries a “Vee” groove intentionally dimensioned in the respective shape for facilitating concentric guidance over cylindrical jobs and thus becomes suitable for checking the accuracy of cylindrical tube bases.
The sharp straight and bent ends of the scriber are used for drawing horizontal lines and internal marking respectively over vertical surfaces.
The marker piece at the pillar’s bottom end of the tool is used for drawing lines over rough surfaces.
The pillar adjuster shaft carries a small hole for adjusting the scriber directly into while the bigger hole is included for associating a dial test Indicator.
A sliding dowel mechanism at the base is used to adjust the position of the scriber over the edge of the tool, thus enabling scribing parallel to the edges.
Scribing blocks are classified according to the height of the incorporated pillars.
The base of scriber tools is made up of case hardened low carbon steel, hardened and tempered cast iron, or high carbon steel. Double terminated pointed scriber ends and dowels are made by using hardened and tempered high carbon steel. Other parts like rocking brackets, pillar, and fine adjustment screw are made up of low carbon steel.
How to Use a Scribing Block
Generally the operating procedure of the tool involves the following steps:
The pillar must be kept almost horizontal.
The bent end of the scriber point should be positioned downward.
Keeping the scriber as close as possible to the pillar, its angle should be held almost horizontal.
The operator should always position himself on the left side of the pillar and the scriber height adjusters.
The fine adjusting screw is kept at a neutral level.
It must be ensured that while operating the scriber its point follows the base of the unit.
Key Seat Rule

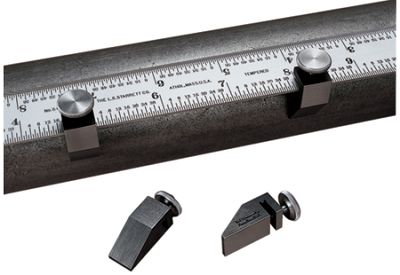
Also referred to as “Box Square”, these tools are used for marking out surfaces of circular bars and tubular metals with lines parallel to their axis.
Key seat rules are also made up of hardened and tempered high carbon steel and are classified with their lengths.
The tools accuracy can be tested by first marking out a line through one of the edges of the tool over a parallel bar and then turning the device to see whether the line exactly coincides with the previous marking. If it does, the key seat rule is a true one.
Surface Plates
These are used for checking the precision of flat surfaces and also for marking out a supported small job in order to form a base from where further measurements can be taken.
The tools are made up of packed grain cast iron, are machine finished and surfaced for perfection. The edges are made into perfect right angles and the top flat.
How to Use Surface Plates
For checking the accuracy of flat surface of a particular job, the flat top of the surface plate tool over which the job is to be tested is first coated with a sort of color film (“Marking”). Once placed over it, the color gets transferred over the job’s surface, either spreading uniformly (if it’s true) or indicating the high spots (in case it’s incorrect).
Surface plates are portable units and operated over bench tops. When not used for a longer periods of time, its surface must be protected by applying oil over it and by keeping it covered under its wooden enclosure.
The accuracy of surface plates is verified through another true surface called “Master Surface”. If a master surface is not accessible, three different surface plates may be checked against each other for comparing inaccuracies.
Vee Blocks
These devices come into play when circular jobs are involved over surface plate tools, Vee Blocks are used for holding and supporting them in place. They are also used in conjunction with scribing blocks for supporting and setting the scriber to correct heights.
Vee blocks are also made up of packed grain cast iron or case hardened mild steel. They come in identical pairs, the pairs being marked with identical numbers or symbol. The surfaces are accurately set with “Vee” at right angles through machine finishing.
How Vee Blocks are Used
The adjustable parallel strips over Vee Blocks allow its height to be raised by bolting them over angle plates. Some clearance at the center permit the Vee Blocks for accommodating rough edges or burrs generally associated with rectangular or square jobs, thus ensuring right seating.
A pair of Vee Blocks may be checked for accuracy by laying a parallel test bar in the “Vees” and verifying that it’s precisely parallel with the surface table using a dial test indicator. An affirmative result indicates that the pair is of equal heights.


